Torchscript 支援
此範例說明 torchvision transforms 在 Tensor 影像上的 torchscript 支援。
from pathlib import Path

import matplotlib.pyplot as plt

import torch
import torch.nn as nn

import torchvision.transforms as v1
from torchvision.io import decode_image

plt.rcParams["savefig.bbox"] = 'tight'
torch.manual_seed(1)

# If you're trying to run that on Colab, you can download the assets and the
# helpers from https://github.com/pytorch/vision/tree/main/gallery/
import sys
sys.path += ["../transforms"]
from helpers import plot
ASSETS_PATH = Path('../assets')
大多數轉換都支援 torchscript。對於組合轉換,我們使用 torch.nn.Sequential 而不是 Compose
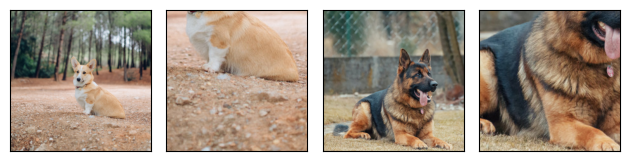
dog1 = decode_image(str(ASSETS_PATH / 'dog1.jpg'))
dog2 = decode_image(str(ASSETS_PATH / 'dog2.jpg'))

transforms = torch.nn.Sequential(
    v1.RandomCrop(224),
    v1.RandomHorizontalFlip(p=0.3),
)

scripted_transforms = torch.jit.script(transforms)

plot([dog1, scripted_transforms(dog1), dog2, scripted_transforms(dog2)])
警告
以上我們使用了 torchvision.transforms 命名空間中的轉換,即「v1」轉換。來自 torchvision.transforms.v2 命名空間的 v2 轉換是建議 在您的程式碼中使用轉換的方式。
v2 轉換也支援 torchscript,但是如果您在 v2 **類別** 轉換上呼叫 torch.jit.script(),您實際上會得到其(腳本化)v1 等效項。由於 v1 和 v2 之間的實作差異,這可能會導致腳本化和急切執行之間的結果略有不同。
如果您確實需要 v2 轉換的 torchscript 支援,**我們建議腳本化來自 torchvision.transforms.v2.functional 命名空間的功能**,以避免意外。
下面我們將展示如何結合影像轉換和模型正向傳遞,同時使用 torch.jit.script 來獲得單一腳本化模組。
讓我們定義一個 Predictor 模組,該模組轉換輸入張量,然後將 ImageNet 模型應用於它。
from torchvision.models import resnet18, ResNet18_Weights


class Predictor(nn.Module):

    def __init__(self):
        super().__init__()
        weights = ResNet18_Weights.DEFAULT
        self.resnet18 = resnet18(weights=weights, progress=False).eval()
        self.transforms = weights.transforms(antialias=True)

    def forward(self, x: torch.Tensor) -> torch.Tensor:
        with torch.no_grad():
            x = self.transforms(x)
            y_pred = self.resnet18(x)
            return y_pred.argmax(dim=1)
現在,讓我們定義 Predictor 的腳本化和非腳本化實例,並將其應用於多個相同大小的張量影像
device = "cuda" if torch.cuda.is_available() else "cpu"

predictor = Predictor().to(device)
scripted_predictor = torch.jit.script(predictor).to(device)

batch = torch.stack([dog1, dog2]).to(device)

res = predictor(batch)
res_scripted = scripted_predictor(batch)
Downloading: "https://download.pytorch.org/models/resnet18-f37072fd.pth" to /root/.cache/torch/hub/checkpoints/resnet18-f37072fd.pth
我們可以驗證腳本化和非腳本化模型的預測是否相同
import json

with open(Path('../assets') / 'imagenet_class_index.json') as labels_file:
    labels = json.load(labels_file)

for i, (pred, pred_scripted) in enumerate(zip(res, res_scripted)):
    assert pred == pred_scripted
    print(f"Prediction for Dog {i + 1}: {labels[str(pred.item())]}")
Prediction for Dog 1: ['n02113023', 'Pembroke']
Prediction for Dog 2: ['n02106662', 'German_shepherd']
由於模型是腳本化的,因此可以輕鬆地將其轉儲到磁碟上並重複使用
import tempfile

with tempfile.NamedTemporaryFile() as f:
    scripted_predictor.save(f.name)

    dumped_scripted_predictor = torch.jit.load(f.name)
    res_scripted_dumped = dumped_scripted_predictor(batch)
assert (res_scripted_dumped == res_scripted).all()
腳本的總執行時間:(0 分鐘 1.428 秒)
