使用效能分析來了解 torch.compile 的效能
torch.profiler 的用途:
torch.profiler 有助於了解程式在核心層級粒度上的效能 - 例如,它可以顯示圖形中斷和 GPU 利用率的程式層級。分析器提供的資料通常可以幫助使用者了解應在哪裡進一步調查以了解模型效能。
為了了解核心層級效能,還有其他工具存在。可以使用 NVIDIA 的 ncu 工具,或inductor 的效能分析工具。
使用 torch.profiler 和檢視追蹤檔的基本概念
範例程式:我們將使用這個分析 resnet18 的範例。請注意此範例程式的以下部分:
包含一個預熱執行 (warm-up run),以等待編譯完成 (這將預熱像 CUDA 快取分配器這樣的系統)
使用
torch.profiler.profile()上下文來分析我們感興趣的部分使用
prof.export_chrome_trace("trace.json")匯出分析結果。
import torch
from torchvision.models import resnet18

model = resnet18().cuda()
inputs = [torch.randn((5, 3, 224, 224), device='cuda') for _ in range(10)]

model_c = torch.compile(model)

def fwd_bwd(inp):
    out = model_c(inp)
    out.sum().backward()

# warm up
fwd_bwd(inputs[0])

with torch.profiler.profile() as prof:
    for i in range(1, 4):
        fwd_bwd(inputs[i])
        prof.step()

prof.export_chrome_trace("trace.json")
檢視 Chrome 追蹤檔:在 Chrome 瀏覽器中,開啟 chrome://tracing 並載入 json 檔案。使用 “w” 和 “s” 鍵進行放大和縮小,並使用 “a” 和 “d” 向左和向右滾動。“?” 將顯示一個帶有快捷鍵清單的“說明”畫面。

在這裡,我們觀察到:* CompiledFunction 和 CompiledFunctionBackward 事件,它們對應於 dynamo 編譯的區域。* 頂部的 CPU 事件和底部的 GPU 事件。
CPU 和 GPU 事件之間的流動
GPU 上的每個核心 (kernel) 都在 CPU 上運行的程式碼啟動後發生。Profiler 可以在 GPU 和 CPU 事件之間繪製連接 (即“流動”),以顯示哪個 CPU 事件啟動了 GPU 核心。這特別有幫助,因為除了少數例外,GPU 核心都是非同步啟動的。
要檢視流動連接,請點擊一個 GPU 核心並點擊 “ac2g”
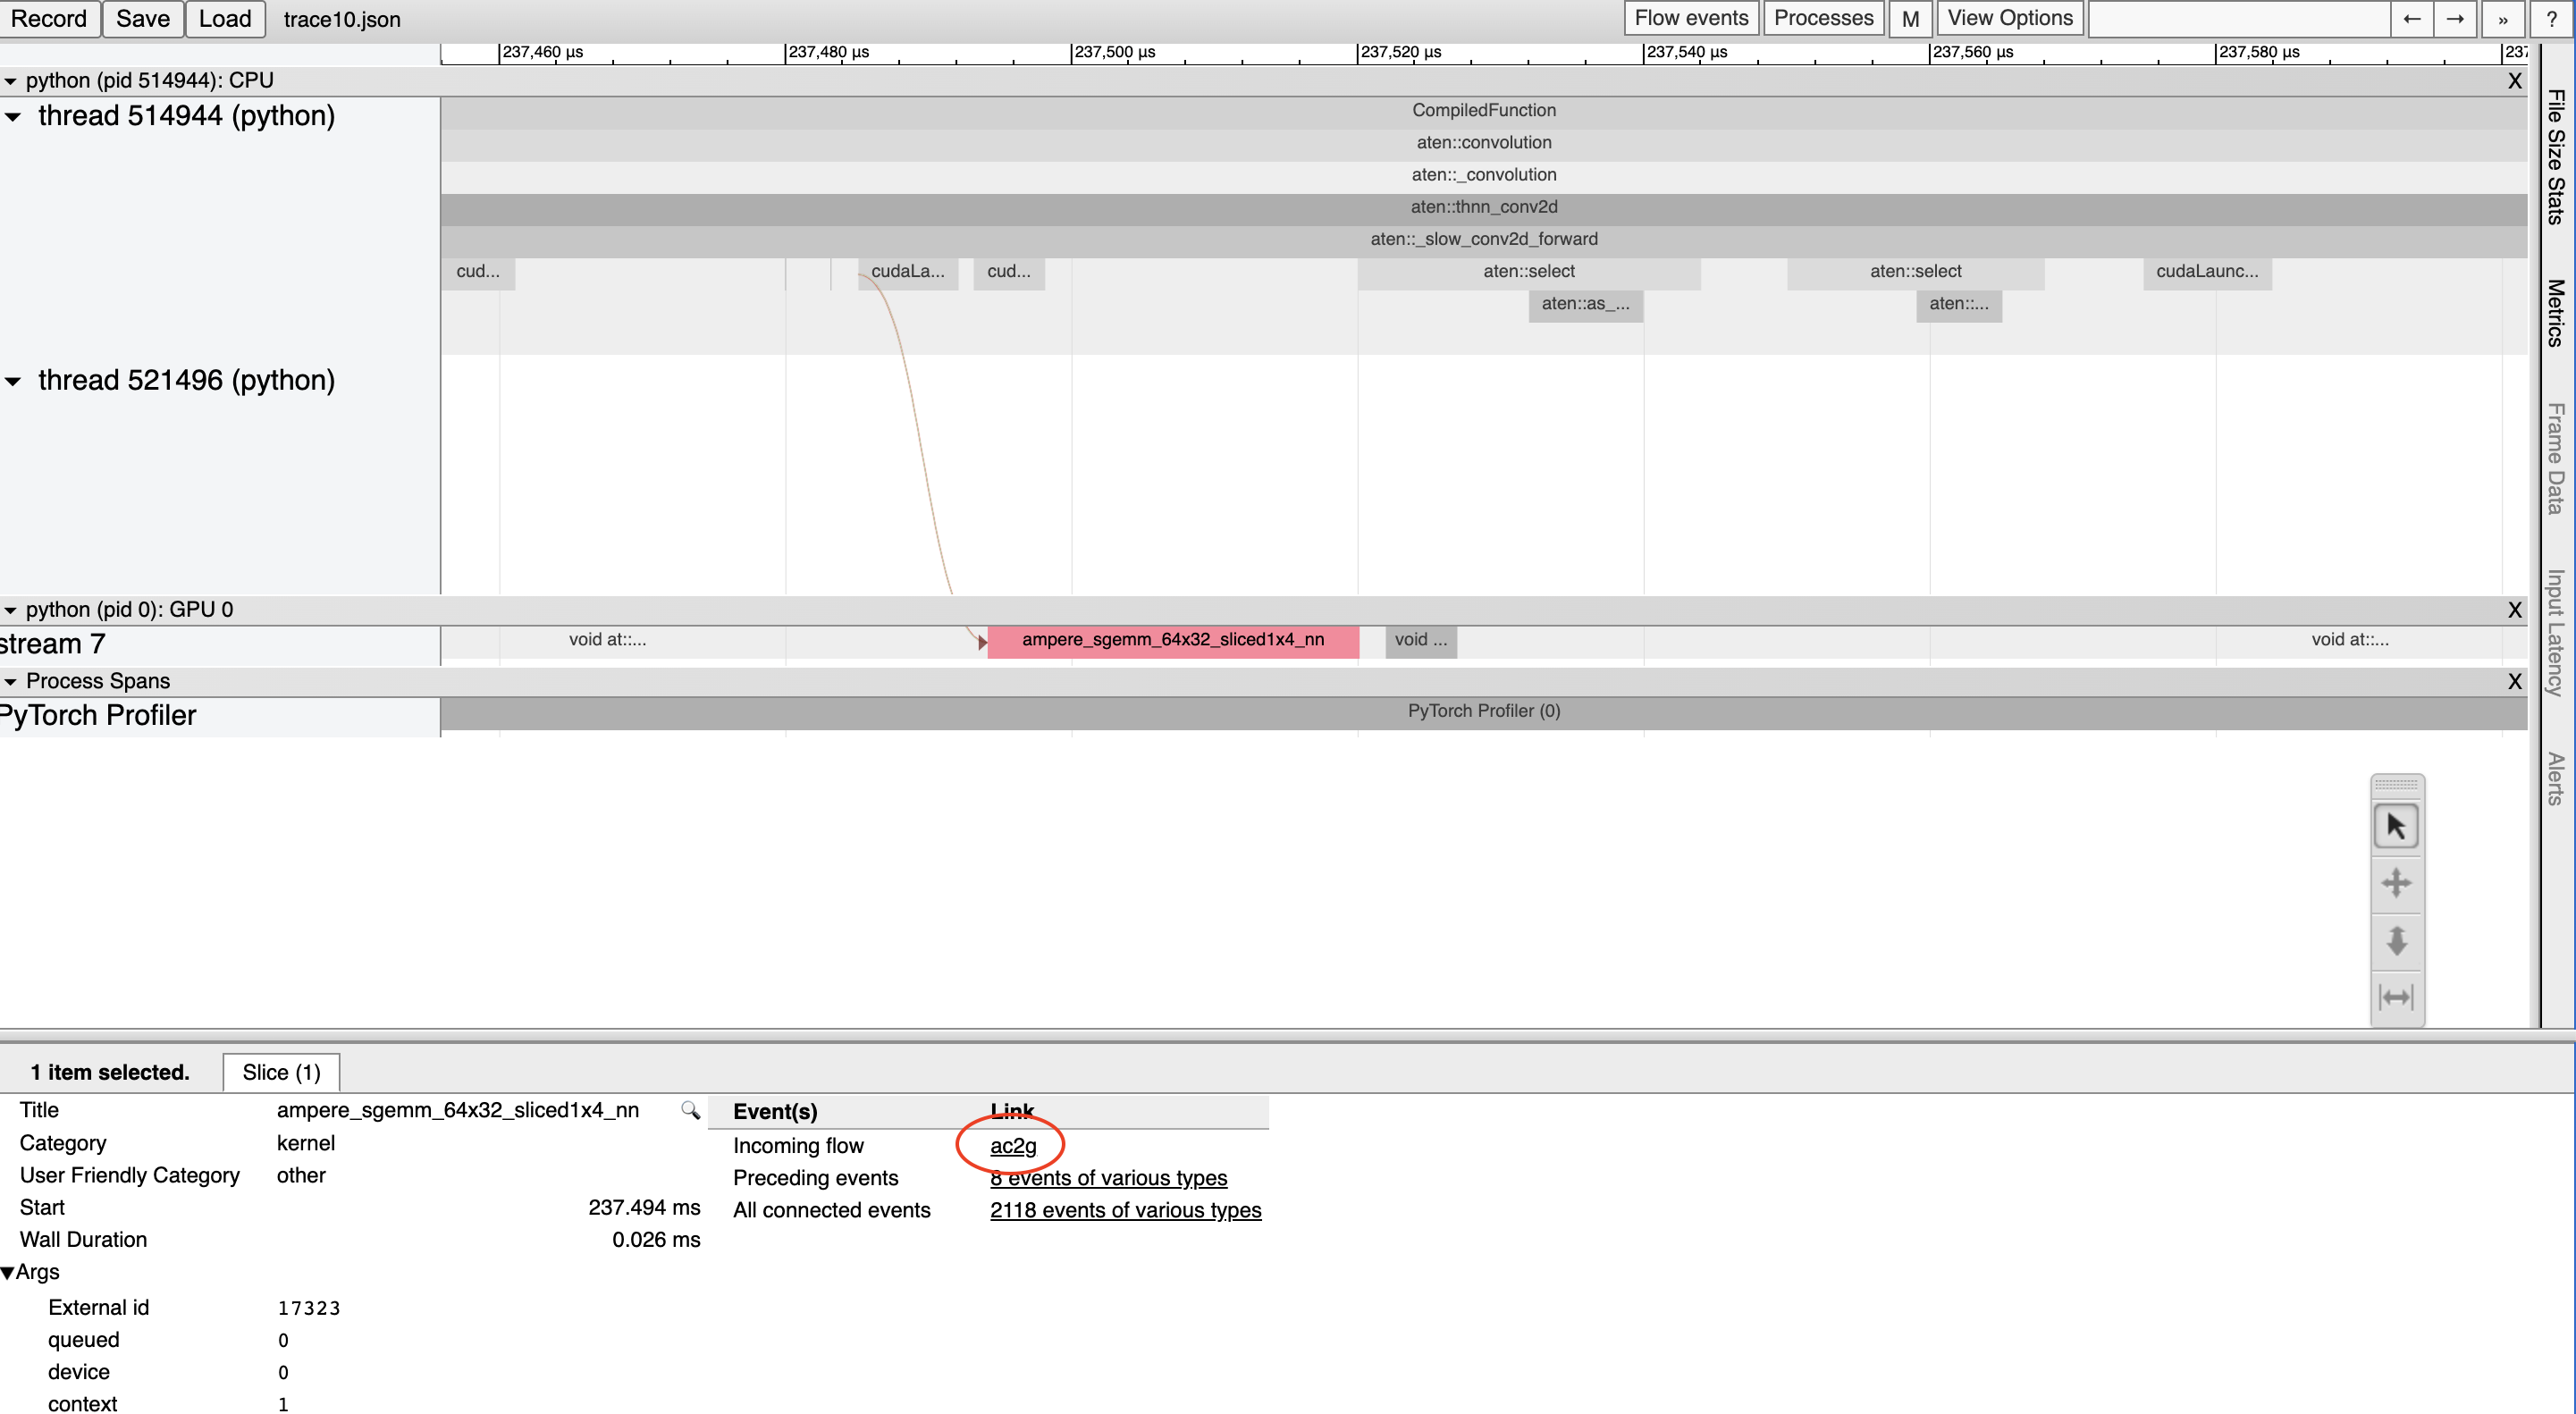
或者,使用頂部的 “Flow events” 下拉選單開啟所有流動。
解決 CUDA Graph 分析問題
當啟用 CUDA Graph 時,某些 CUDA 配置 (驅動程式版本低於 525.85.12 或 CUDA < 12) 可能會遇到分析工具和 CUDA Graph 之間的問題。要解決這些問題,請在程式碼頂部新增一個空的分析上下文:
import torch

torch.profiler._utils._init_for_cuda_graphs()

# ... rest of program
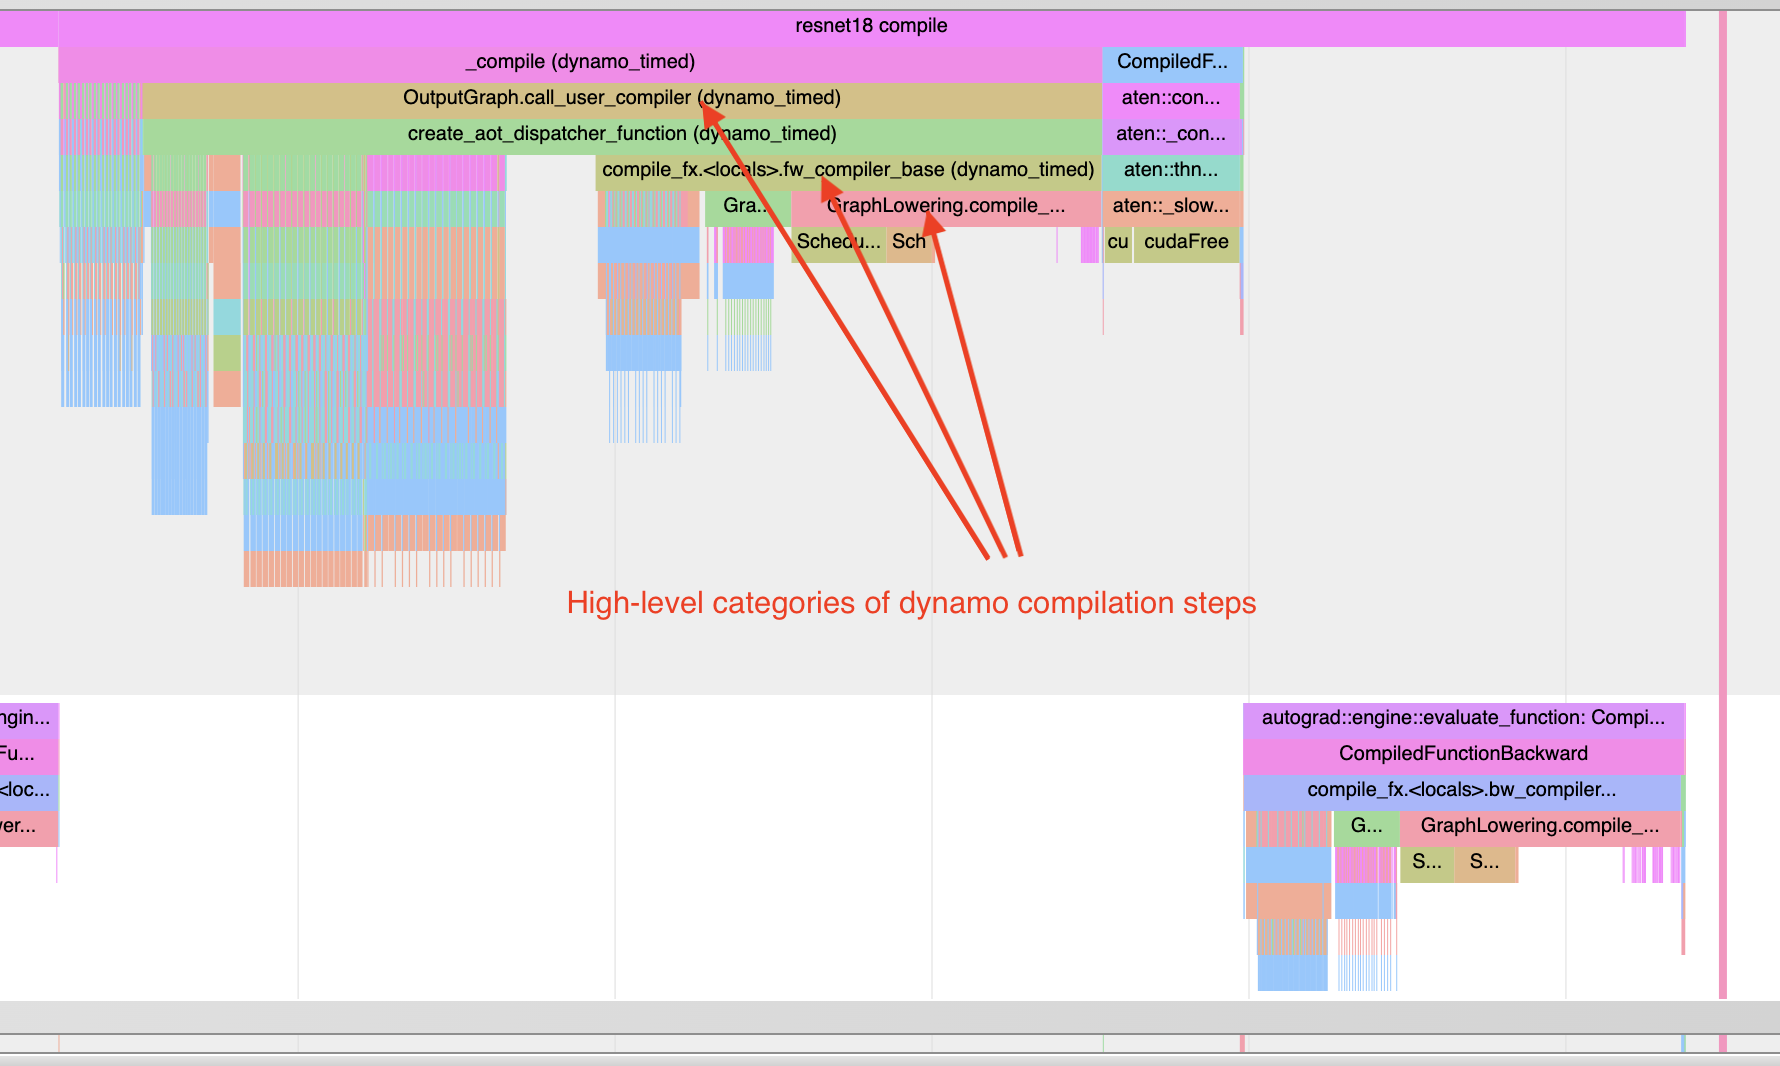
了解編譯時間
要了解為什麼編譯需要很長時間,您可以分析首次調用 torch.compile 編譯的程式。請記住,編譯的分析追蹤檔可能比典型的分析更失真,因為編譯工作負載可能與典型的 PyTorch 工作負載非常不同。在某些情況下,追蹤檔也可能非常大。大於 1GB 的追蹤檔可能難以使用 Chrome 追蹤工具開啟。
注意:大致相同的資訊也可以透過非圖形化格式獲得,使用 torch._dynamo.utils.compile_times()。此工具不會顯示編譯步驟何時發生,但它會顯示每個步驟所花費的時間 - 並且時間不會受到任何分析開銷的影響。
請參閱下面的範例
import torch
from torchvision.models import resnet18

model = resnet18().cuda()
inputs = [torch.randn((5, 3, 224, 224), device='cuda') for _ in range(10)]

model_c = torch.compile(model)

def fwd_bwd(inp):
    out = model_c(inp)
    out.sum().backward()

def warmup_compile():
    def fn(x):
        return x.sin().relu()

    x = torch.rand((2, 2), device='cuda', requires_grad=True)
    fn_c = torch.compile(fn)
    out = fn_c(x)
    out.sum().backward()

with torch.profiler.profile() as prof:
    with torch.profiler.record_function("warmup compile"):
        warmup_compile()

    with torch.profiler.record_function("resnet18 compile"):
        fwd_bwd(inputs[0])

prof.export_chrome_trace("trace_compile.json")
注意以下幾點
第一次調用應在分析期間發生,以便捕獲編譯
新增預熱編譯,以便初始化任何需要延遲初始化的系統。
尋找 Graph Breaks:“Torch-Compiled Region” 和 “CompiledFunction”
雖然有一些記錄工具可以用於識別 Graph Breaks,但 Profiler 提供了一種快速的可視化方法來識別 Graph Breaks。 有兩個 Profiler 事件需要注意:Torch-Compiled Region 和 CompiledFunction。
Torch-Compiled Region - 在 PyTorch 2.2 中引入 - 是一個 Profiler 事件,涵蓋整個編譯區域。Graph Breaks 幾乎總是看起來一樣:巢狀的 “Torch-Compiled Region” 事件。
如果您對每個函數分別應用 torch.compile() 運行兩個單獨的函數,您通常應該看到兩個相鄰的 (即 NOT 堆疊/巢狀) Torch-Compiled 區域。同時,如果您遇到 Graph Breaks (或 disable()’ed/skipped 區域),請預期看到巢狀的 “Torch-Compiled Region” 事件。
CompiledFunction - 在 PyTorch 2.0 中引入 - 是一個 Profiler 事件,當任何輸入需要梯度時出現。每個 Graph Break 都會中斷一個 CompiledFunction 區塊,將其分成兩部分。CompiledFunction 事件僅在涉及 Autograd 時才會出現,即圖中的某些輸入張量具有 requires_grad=True。
當 CompiledFunction 出現在追蹤中時,它通常會與反向傳播中的 CompiledFunctionBackward 事件配對。如果調用了反向函數,追蹤中應該會出現一個連接兩者的 “fwd-bwd link”。
如果您的用例包含一個不需要 grad 且不包含 “Torch-Compiled Region” 事件的圖,則可能更難識別是否正確應用了 torch.compile。 一個線索可能是 Inductor 生成的 Triton 核心的存在。
請參閱下面的合成範例以進行示範
import torch
import torch._dynamo

class ModelWithBreaks(torch.nn.Module):
    def __init__(self):
        super().__init__()
        def create_sequential():
            return torch.nn.Sequential(
                torch.nn.Linear(128, 128),
                torch.nn.ReLU(),
                torch.nn.Linear(128, 128),
                torch.nn.ReLU(),
            )
        self.mod1 = create_sequential()
        self.mod2 = create_sequential()
        self.mod3 = create_sequential()
        self.mod4 = create_sequential()

    def forward(self, inp):
        mod1 = self.mod1(inp)
        torch._dynamo.graph_break()
        mod2 = self.mod2(mod1)
        torch._dynamo.graph_break()
        mod3 = self.mod3(mod2)
        torch._dynamo.graph_break()
        mod4 = self.mod4(mod3)
        return mod4


model = ModelWithBreaks().cuda()
inputs = [torch.randn((128, 128), device='cuda') for _ in range(10)]

model_c = torch.compile(model)

def fwd_bwd(inp):
    out = model_c(inp)
    out.sum().backward()

# warm up
fwd_bwd(inputs[0])

with torch.profiler.profile() as prof:
    for i in range(1, 4):
        fwd_bwd(inputs[i])
        prof.step()

prof.export_chrome_trace("trace_break.json")

運算子核心 (Operator Kernels)
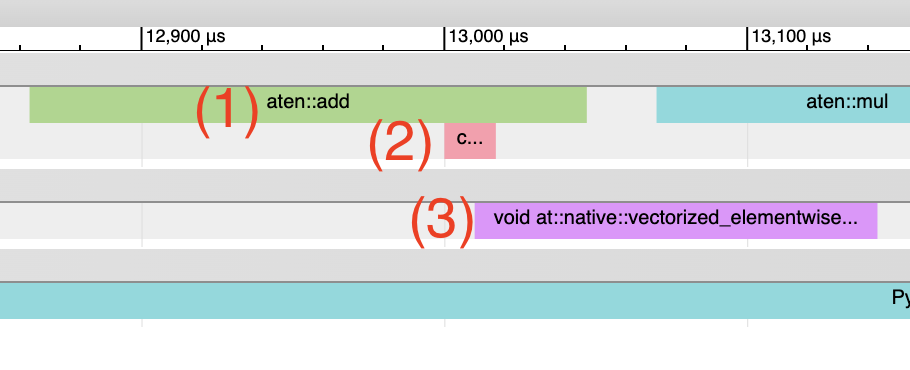
當一個運算子啟動時,我們期望看到幾個事件:
CPU 端事件
核心啟動 (如果處理的是 GPU 核心)
GPU 端事件
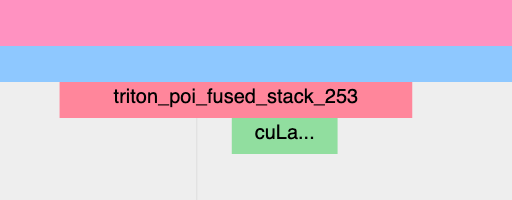
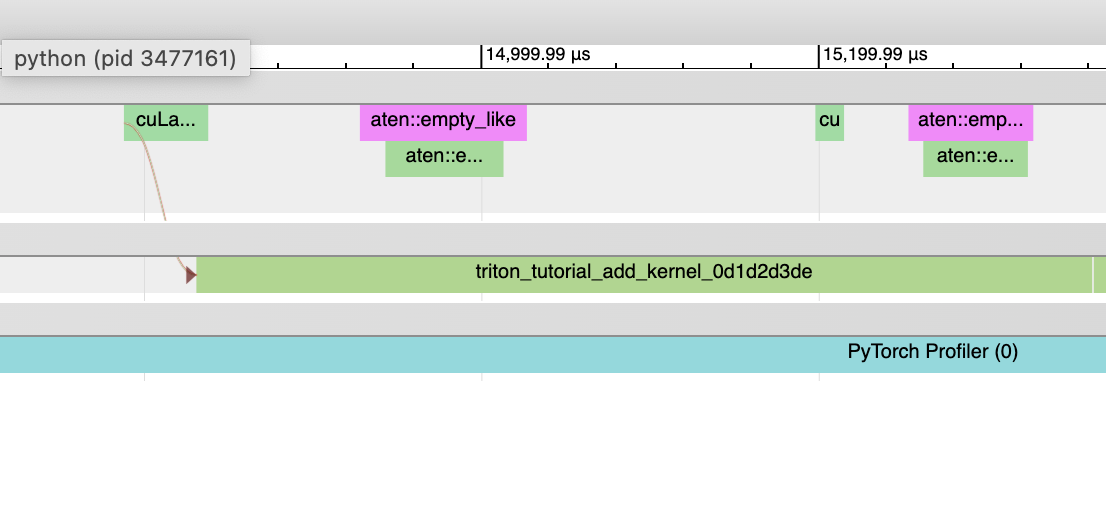
Inductor 生成的 Triton 核心: 1. CPU 端事件應顯示為以 “triton_” 為前綴的事件。這些事件目前只有最少的信息 - 核心名稱和啟動,但比典型的 aten 核心啟動的信息少 (後者包含輸入形狀、類型等)。2. 核心啟動應顯示為 cuLaunchKernel 而不是 cudaLaunchKernel (cudaLaunchKernel 是 aten 運算的典型情況) 3. 應該出現 GPU 端事件,並且名稱的描述性取決於 unique_kernel_names 的 inductor 配置
非 Inductor 生成的 Triton 核心
CPU 端事件可能不會出現在追蹤中;自動插入 Profiler 事件的機制目前在 Inductor 層級實現,因此繞過 Inductor 的 Triton 核心可能不會出現在追蹤中,除非使用者手動註釋它們
核心啟動應顯示為 cuLaunchKernel 而不是 cudaLaunchKernel (cudaLaunchKernel 是 aten 運算的典型情況)
應該出現 GPU 端事件,其名稱與編寫的 Triton 核心類似。
Inductor 生成的 CPU 核心
CPU 端事件不會出現在追蹤中;我們尚未為此新增分析。
核心啟動和 GPU 端事件不存在
非 Triton 核心 (即 aten 核心或自訂運算) 也應該預期有時會出現在追蹤中。 有時,Inductor 會回退到原始運算實現,在這種情況下,您會看到對 aten 運算的呼叫。
啟動開銷
一個常見的問題是不佳的 GPU 利用率。 一個快速識別方法是 GPU 上核心之間存在很大的間隙
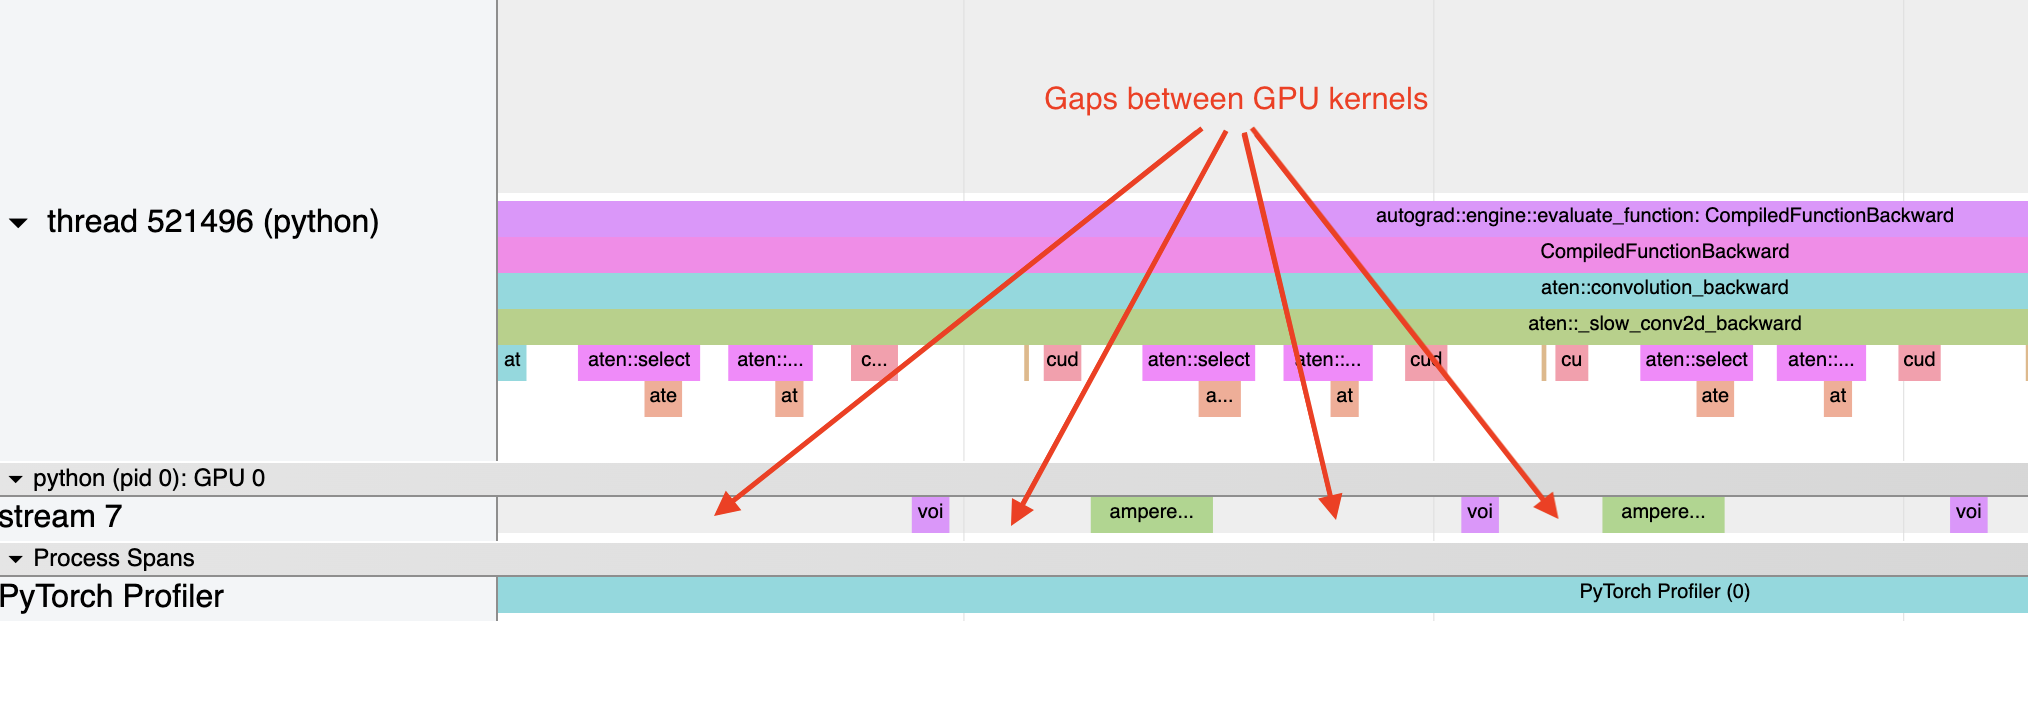
這通常是由於 CPU 開銷造成的,例如,如果核心啟動之間 CPU 上花費的時間大於 GPU 處理核心所花費的時間。 對於小批量大小,這個問題更常見。
使用 Inductor 時,當啟動開銷是一個問題時,啟用 CUDA Graph 通常可以幫助提高效能。
