捷徑

總覽

../_images/components_diagram.jpg

備註

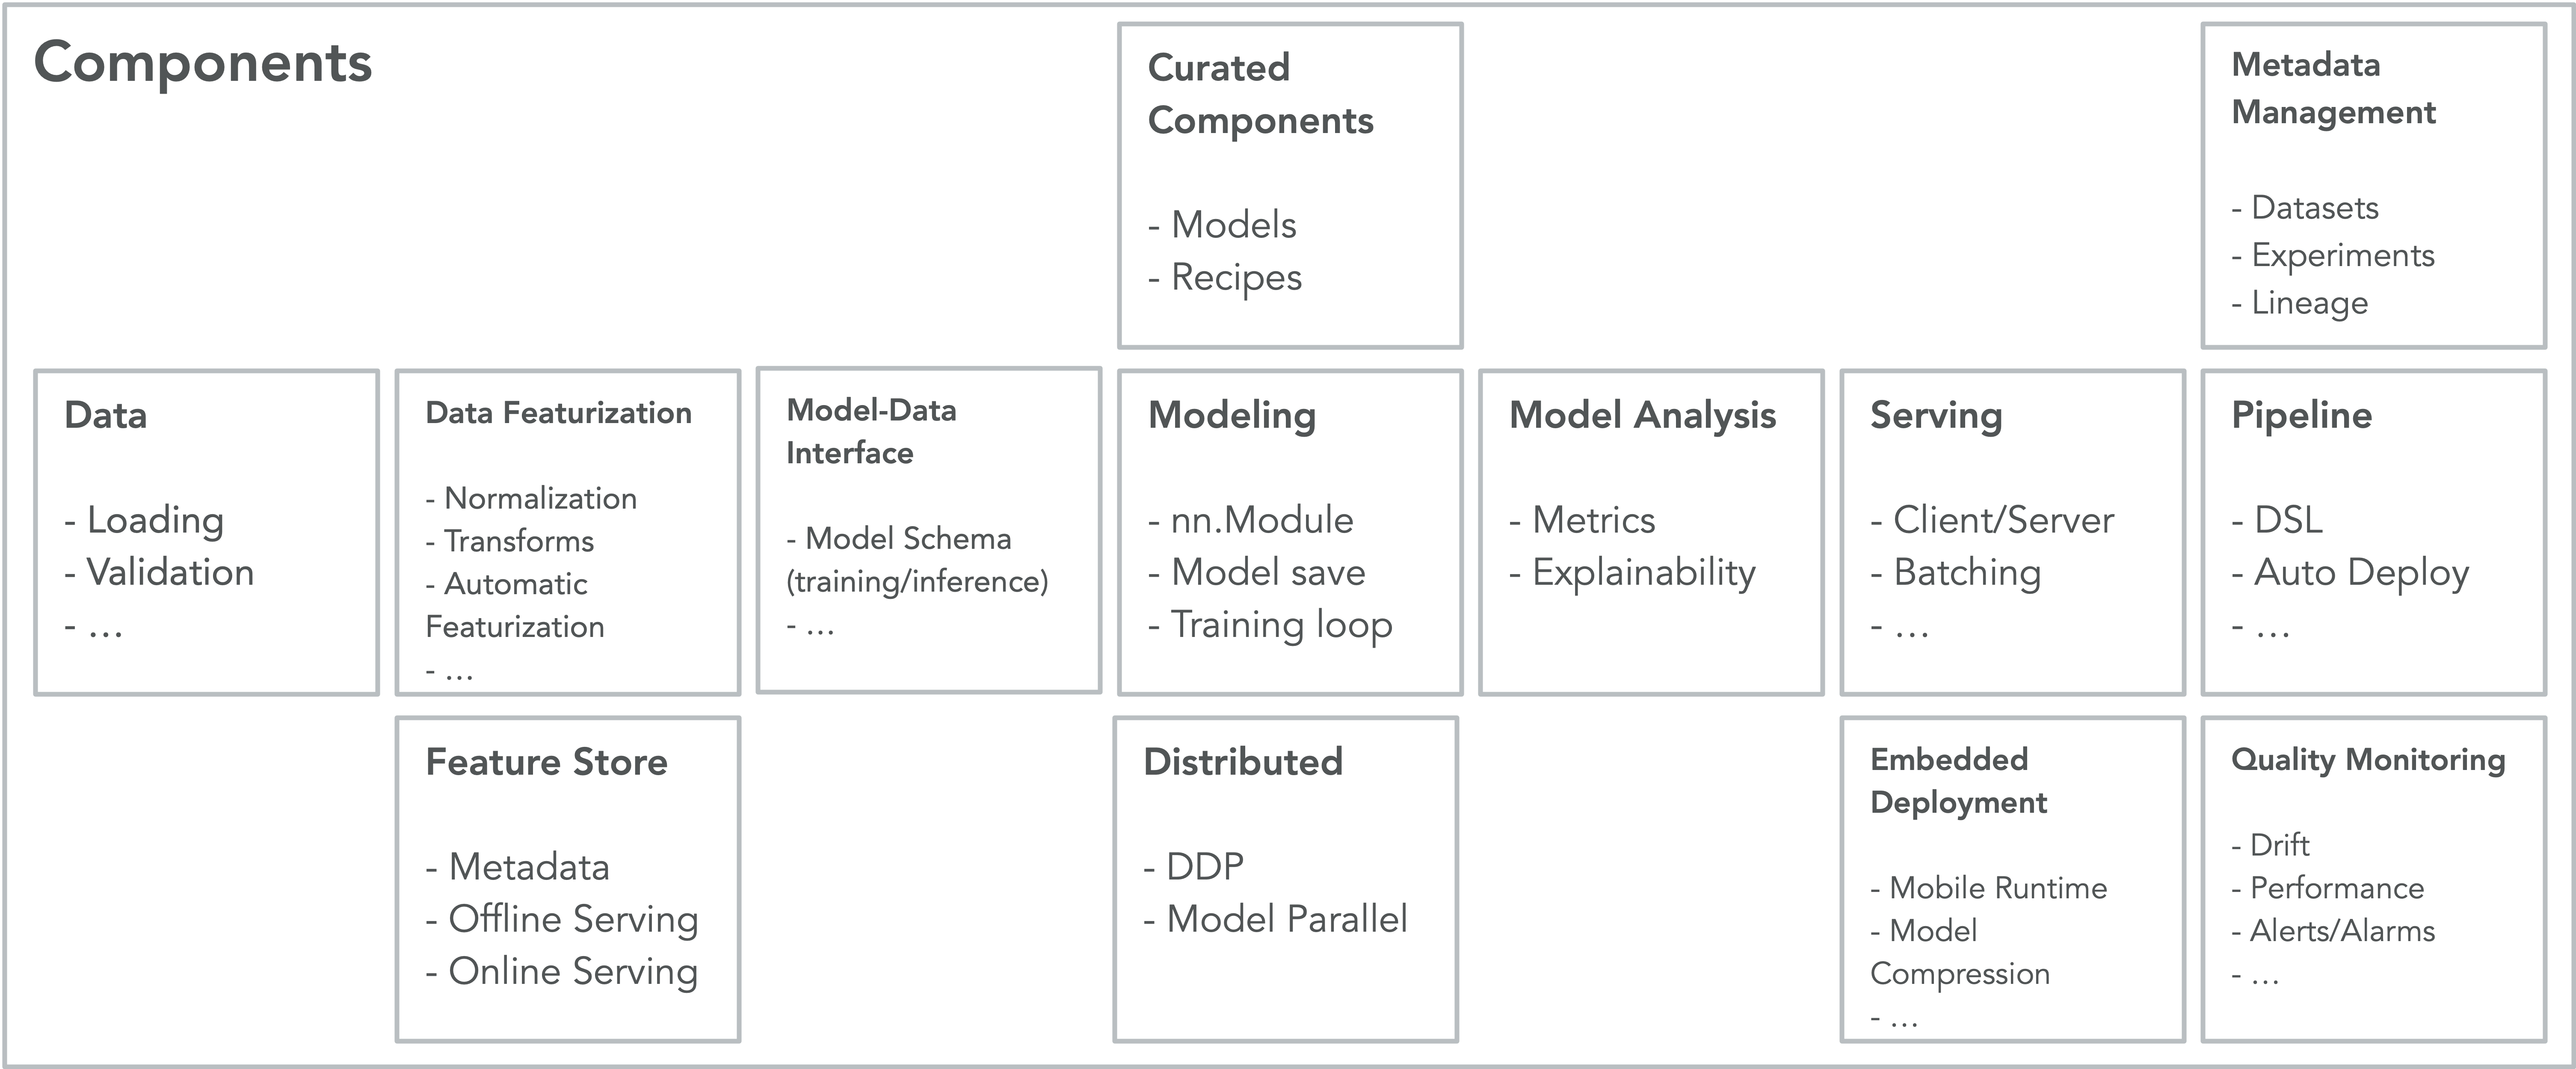
以上圖表僅供說明之用。並非所有方塊目前都可立即使用。

此模組包含一組內建的 TorchX 元件。目錄結構按元件類別組織。元件只是範本化的應用程式規格。將它們視為不同類型作業定義的工廠方法。在此模組中傳回 specs.AppDef 的函數就是我們所說的元件。

您可以瀏覽 torchx.components 模組或我們的 文件頁面 中的元件庫。

使用內建元件

找到內建元件後,您可以:

  1. 將元件作為作業執行

  2. 在工作流程 (管道) 的環境中使用元件

在這兩種情況下,元件都將作為作業執行,不同之處在於作業將作為獨立作業直接在排程器上執行,或者作為具有上游和/或下游相依性的工作流程中的「階段」執行。

備註

根據元件的語義,作業可以是單節點或分散式的。例如,如果元件具有單一角色,其中 role.num_replicas == 1,則該作業是單節點作業。如果元件具有多個角色和/或任何角色的 num_replicas > 1,則該作業是多節點分散式作業。

不確定應該將元件作為作業執行還是作為管道階段執行?使用以下經驗法則

  1. 剛開始使用?透過將元件作為作業執行來熟悉元件

  2. 需要作業相依性?將元件作為管道階段執行

  3. 不需要作業相依性?將元件作為作業執行

創作

由於元件只是一個傳回 specs.AppDef 的 Python 函數,因此創作您自己的元件就像編寫具有以下規則的 Python 函數一樣簡單

  1. 元件函數必須傳回 specs.AppDef,並且必須指定傳回類型

  2. 元件的所有參數都必須使用 PEP 484 類型註釋,並且類型必須是以下其中之一
    1. 基元:intfloatstrbool

    2. 可選基元:Optional[int]Optional[float]Optional[str]

    3. 基元的映射:Dict[Primitive_key, Primitive_value]

    4. 基元的清單:List[Primitive_values]

    5. 可選集合:Optional[List]Optional[Dict]

    6. VAR_ARG:*arg(在將參數傳遞給入口點腳本時很有用)

  3. (可選)Google 格式 的文件字串(特別參閱 function_with_pep484_type_annotations)。此文件字串純粹用於提供資訊,因為 torchx cli 使用它來自動產生資訊性 --help 訊息,這在與他人共用元件時很有用。如果元件沒有文件字串,--help 選項仍然有效,但參數將會有一個固定的描述(見下文)。請注意,當透過 torchx.runner 以程式設計方式執行元件時,torchx 完全不會擷取文件字串。

以下是一個啟動 DDP 腳本的元件範例,它是 torchx.components.dist.ddp() 內建元件的簡化版本。

import os
import torchx.specs as specs

def ddp(
    *script_args: str,
    image: str,
    script: str,
    host: str = "aws_p3.2xlarge",
    nnodes: int = 1,
    nproc_per_node: int = 1,
) -> specs.AppDef:
   return specs.AppDef(
       name=os.path.basename(script),
       roles=[
           spec.Role(
               name="trainer",
               image=image,
               resource=specs.named_resources[host],
               num_replicas=nnodes,
               entrypoint="python",
               args=[
                   "-m",
                   "torch.distributed.run",
                   "--rdzv_backend=c10d",
                   "--rdzv_endpoint=localhost:5900",
                   f"--nnodes={nnodes}",
                   f"--nprocs_per_node={nprocs_per_node}",
                   "-m",
                   script,
                   *script_args,
               ],
           ),
       ]
   )

假設上述元件儲存在 example.py 中,我們可以對其執行 --help,如下所示

$ torchx ./example.py:ddp --help
usage: torchx run ...torchx_params... ddp  [-h] --image IMAGE --script SCRIPT [--host HOST]
                                          [--nnodes NNODES] [--nproc_per_node NPROC_PER_NODE]
                                          ...

AppDef: ddp. TIP: improve this help string by adding a docstring ...<omitted for brevity>...

positional arguments:
  script_args           (required)

optional arguments:
  -h, --help            show this help message and exit
  --image IMAGE         (required)
  --script SCRIPT       (required)
  --host HOST           (default: aws_p3.2xlarge)
  --nnodes NNODES       (default: 1)
  --nproc_per_node NPROC_PER_NODE
                        (default: 1)

如果我們加入一個文件字串,如下所示

def ddp(...) -> specs.AppDef:
  """
  DDP Simplified.

  Args:
     image: name of the docker image containing the script + deps
     script: path of the script in the image
     script_args: arguments to the script
     host: machine type (one from named resources)
     nnodes: number of nodes to launch
     nproc_per_node: number of scripts to launch per node

  """

  # ... component body same as above ...
  pass

--help 訊息將會反映文件字串中的函數和參數描述,如下所示

usage: torchx run ...torchx_params... ddp  [-h] --image IMAGE --script SCRIPT [--host HOST]
                                          [--nnodes NNODES] [--nproc_per_node NPROC_PER_NODE]
                                          ...

App spec: DDP simplified.

positional arguments:
  script_args           arguments to the script

optional arguments:
  -h, --help            show this help message and exit
  --image IMAGE         name of the docker image containing the script + deps
  --script SCRIPT       path of the script in the image
  --host HOST           machine type (one from named resources)
  --nnodes NNODES       number of nodes to launch
  --nproc_per_node NPROC_PER_NODE
                        number of scripts to launch per node

驗證

若要驗證您是否正確定義了元件,您可以:

  1. (最簡單的方法)使用 cli 執行元件的 --help 測試執行:torchx run --dryrun ~/component.py:train --help

  2. 使用元件 linter(請參閱 dist_test.py 範例)

作為作業執行

您可以使用 torchx cli 將元件作為作業執行,也可以使用 torchx.runner 以程式設計方式執行。兩者是相同的,事實上,cli 在底層使用了 runner,所以您可以自由選擇。 快速入門 指南將引導您完成入門的基本知識。

程式設計執行

若要以程式設計方式執行內建元件或您自己的元件,只需將元件作為一般的 Python 函數呼叫,並將其傳遞給 torchx.runner。以下是一個呼叫 utils.echo 內建元件的範例

from torchx.components.utils import echo
from torchx.runner import get_runner

get_runner().run(echo(msg="hello world"), scheduler="local_cwd")

CLI 執行(內建元件)

從命令列執行元件時,您必須傳遞要呼叫的元件函數。對於內建元件,格式為 {component_module}.{component_fn},其中 {component_module} 是元件相對於 torchx.components 的模組路徑,而 {component_fn} 是該模組中的元件函數。因此,對於 torchx.components.utils.echo,我們會刪除 torchx.components 前綴並將其執行為

$ torchx run utils.echo --msg "hello world"

有關更多資訊,請參閱CLI 文件

CLI 執行(自訂)

若要使用 CLI 執行自訂元件,您必須使用格式略有不同的語法 {component_path}:{component_fn}。其中,{component_path} 是元件 Python 檔案的檔案路徑,而 {component_fn} 是該檔案中元件函數的名稱。假設您的元件位於 /home/bob/component.py 中,且元件函數稱為 train(),則您將如下執行它

# option 1. use absolute path
$ torchx run /home/bob/component.py:train --help

# option 2. let the shell do the expansion
$ torchx run ~/component.py:train --help

# option 3. same but after CWD to $HOME
$ cd ~/
$ torchx run ./component.py:train --help

# option 4. files can be relative to CWD
$ cd ~/
$ torchx run component.py:train --help

備註

如果您知道 TorchX 的安裝目錄,則也可以透過這種方式執行內建元件!

從 CLI 傳遞元件參數

由於元件只是 Python 函數,因此以程式設計方式使用它們非常簡單。如上所示,當透過 CLI 的 run 子命令執行元件時,元件參數會使用雙破折號 + 參數名稱語法(例如 --param1=1--param1 1)作為程式引數傳遞。CLI 會根據元件的說明字串自動產生 argparse 解析器。以下是關於如何傳遞各種類型的元件參數的摘要,假設元件的定義如下

# in comp.py
from typing import Dict, List
import torchx.specs as specs

def f(i: int, f: float, s: str, b: bool, l: List[str], d: Dict[str, str], *args) -> specs.AppDef:
   """
   Example component

   Args:
       i: int param
       f: float param
       s: string param
       b: bool param
       l: list param
       d: map param
       args: varargs param

   Returns: specs.AppDef
   """

   pass
  1. 說明:torchx run comp.py:f --help

  2. 基本類型(intfloatstr):torchx run comp.py:f --i 1 --f 1.2 --s "bar"

  3. 布林值:torchx run comp.py:f --b True(或 --b False

  4. 映射:torchx run comp.py:f --d k1=v1,k2=v2,k3=v3

  5. 清單:torchx run comp.py:f --l a,b,c

  6. VAR_ARG:*args 作為位置引數而非引數傳遞,因此它們在命令的末尾指定。-- 分隔符號用於開始 VAR_ARGS 區段。當元件和應用程式具有相同的引數或傳遞 --help 引數時,這非常有用。以下是幾個範例:* *args=["arg1", "arg2", "arg3"]torchx run comp.py:f --i 1 arg1 arg2 arg3 * *args=["--flag", "arg1"]torchx run comp.py:f --i 1 --flag arg1 `` * ``*args=["--help"]torchx run comp.py:f -- --help * *args=["--i", "2"]torchx run comp.py:f --i 1 -- --i 2

在管道中執行

torchx.pipelines 定義了將 torchx 元件轉換為表示目標管道平台中管道「階段」的物件的轉接器(支援的管道協調器清單請參閱管道)。

其他資源

請參閱

  1. 此模組中定義的元件作為說明性範例

  2. 定義您自己的元件 快速入門指南

  3. 元件最佳實務 指南

  4. 應用程式最佳實務 指南

文件

存取 PyTorch 的完整開發人員文件

檢視文件

教學課程

取得適用於初學者和進階開發人員的深入教學課程

檢視教學課程

資源

尋找開發資源並取得問題解答

檢視資源