光流:使用 RAFT 模型預測移動
光流是預測兩個圖像之間移動的任務,通常是影片的兩個連續影格。光流模型將兩個圖像作為輸入,並預測一個流:該流指示第一個圖像中每個像素的位移,並將其映射到第二個圖像中的對應像素。流是 (2, H, W) 維張量,其中第一個軸對應於預測的水平和垂直位移。
以下範例說明如何使用 torchvision 透過我們的 RAFT 模型實作來預測流。我們還將看到如何將預測的流轉換為 RGB 圖像以進行視覺化。
import numpy as np
import torch
import matplotlib.pyplot as plt
import torchvision.transforms.functional as F


plt.rcParams["savefig.bbox"] = "tight"


def plot(imgs, **imshow_kwargs):
    if not isinstance(imgs[0], list):
        # Make a 2d grid even if there's just 1 row
        imgs = [imgs]

    num_rows = len(imgs)
    num_cols = len(imgs[0])
    _, axs = plt.subplots(nrows=num_rows, ncols=num_cols, squeeze=False)
    for row_idx, row in enumerate(imgs):
        for col_idx, img in enumerate(row):
            ax = axs[row_idx, col_idx]
            img = F.to_pil_image(img.to("cpu"))
            ax.imshow(np.asarray(img), **imshow_kwargs)
            ax.set(xticklabels=[], yticklabels=[], xticks=[], yticks=[])

    plt.tight_layout()
使用 Torchvision 讀取影片
我們將首先使用 read_video() 讀取影片。或者,可以使用新的 VideoReader API(如果 torchvision 是從原始碼建置的)。我們在此使用的影片可以從 pexels.com 免費使用,感謝 Pavel Danilyuk。
import tempfile
from pathlib import Path
from urllib.request import urlretrieve


video_url = "https://download.pytorch.org/tutorial/pexelscom_pavel_danilyuk_basketball_hd.mp4"
video_path = Path(tempfile.mkdtemp()) / "basketball.mp4"
_ = urlretrieve(video_url, video_path)
read_video() 會傳回影片影格、音訊影格以及與影片相關聯的元資料。在我們的例子中,我們只需要影片影格。
在這裡,我們將僅在 2 組預先選定的影格對(即影格 (100, 101) 和 (150, 151))之間進行 2 次預測。 這些影格對中的每一對都對應於單一模型輸入。
from torchvision.io import read_video
frames, _, _ = read_video(str(video_path), output_format="TCHW")

img1_batch = torch.stack([frames[100], frames[150]])
img2_batch = torch.stack([frames[101], frames[151]])

plot(img1_batch)

/pytorch/vision/torchvision/io/video.py:197: UserWarning: The pts_unit 'pts' gives wrong results. Please use pts_unit 'sec'.
  warnings.warn("The pts_unit 'pts' gives wrong results. Please use pts_unit 'sec'.")
RAFT 模型接受 RGB 圖像。 我們首先從 read_video() 取得影格,並調整它們的大小以確保它們的尺寸可以被 8 整除。請注意,我們明確地使用 antialias=False,因為這些模型就是這樣訓練的。然後我們使用捆綁在權重中的轉換,以便預處理輸入並將其值重新縮放到所需的 [-1, 1] 區間。
from torchvision.models.optical_flow import Raft_Large_Weights

weights = Raft_Large_Weights.DEFAULT
transforms = weights.transforms()


def preprocess(img1_batch, img2_batch):
    img1_batch = F.resize(img1_batch, size=[520, 960], antialias=False)
    img2_batch = F.resize(img2_batch, size=[520, 960], antialias=False)
    return transforms(img1_batch, img2_batch)


img1_batch, img2_batch = preprocess(img1_batch, img2_batch)

print(f"shape = {img1_batch.shape}, dtype = {img1_batch.dtype}")
shape = torch.Size([2, 3, 520, 960]), dtype = torch.float32
使用 RAFT 估計光流
我們將使用來自raft_large()的 RAFT 實作,其架構與原始論文中描述的相同。我們也提供 raft_small() 模型建構器,它更小且執行速度更快,但犧牲了一些準確性。
from torchvision.models.optical_flow import raft_large

# If you can, run this example on a GPU, it will be a lot faster.
device = "cuda" if torch.cuda.is_available() else "cpu"

model = raft_large(weights=Raft_Large_Weights.DEFAULT, progress=False).to(device)
model = model.eval()

list_of_flows = model(img1_batch.to(device), img2_batch.to(device))
print(f"type = {type(list_of_flows)}")
print(f"length = {len(list_of_flows)} = number of iterations of the model")
Downloading: "https://download.pytorch.org/models/raft_large_C_T_SKHT_V2-ff5fadd5.pth" to /root/.cache/torch/hub/checkpoints/raft_large_C_T_SKHT_V2-ff5fadd5.pth
type = <class 'list'>
length = 12 = number of iterations of the model
RAFT 模型會輸出預測光流的列表,其中每個項目都是一個 (N, 2, H, W) 的預測光流批次,對應於模型中的給定「迭代」。有關模型迭代本質的更多詳細資訊,請參閱原始論文。在這裡,我們只對最終預測的光流感興趣(它們是最準確的光流),因此我們只會檢索列表中的最後一個項目。
如上所述,光流是一個維度為 (2, H, W) 的張量(對於光流批次,則為 (N, 2, H, W)),其中每個項目對應於每個像素從第一張圖片到第二張圖片的水平和垂直位移。請注意,預測的光流以「像素」為單位,它們沒有針對圖像的尺寸進行歸一化。
predicted_flows = list_of_flows[-1]
print(f"dtype = {predicted_flows.dtype}")
print(f"shape = {predicted_flows.shape} = (N, 2, H, W)")
print(f"min = {predicted_flows.min()}, max = {predicted_flows.max()}")
dtype = torch.float32
shape = torch.Size([2, 2, 520, 960]) = (N, 2, H, W)
min = -3.8997180461883545, max = 6.400400161743164
視覺化預測的光流
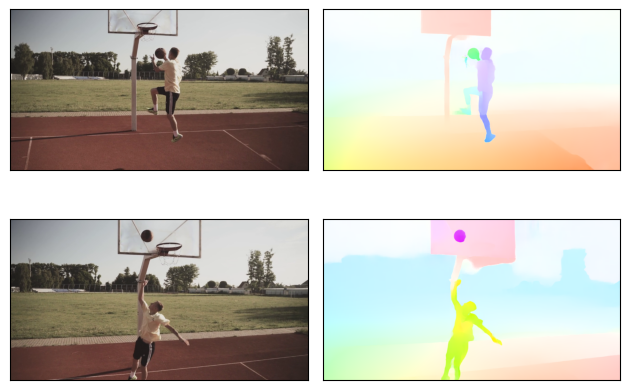
Torchvision 提供 flow_to_image() 工具,將光流轉換為 RGB 圖像。它也支援光流批次。光流中的每個「方向」都會映射到給定的 RGB 顏色。在下面的圖像中,模型假設具有相似顏色的像素朝相似的方向移動。該模型能夠正確預測球和運動員的運動。特別注意第一張圖像中球的不同預測方向(向左移動)和第二張圖像中的球(向上移動)。
from torchvision.utils import flow_to_image

flow_imgs = flow_to_image(predicted_flows)

# The images have been mapped into [-1, 1] but for plotting we want them in [0, 1]
img1_batch = [(img1 + 1) / 2 for img1 in img1_batch]

grid = [[img1, flow_img] for (img1, flow_img) in zip(img1_batch, flow_imgs)]
plot(grid)
額外內容:建立預測光流的 GIF
在上面的例子中,我們只展示了 2 對影格的預測光流。應用光流模型的一種有趣方式是在整個影片上執行模型,並從所有預測的光流建立一個新的影片。以下是一個可以幫助您入門的程式碼片段。我們註釋掉這段程式碼,因為這個範例是在沒有 GPU 的機器上呈現的,執行時間會太長。
# from torchvision.io import write_jpeg
# for i, (img1, img2) in enumerate(zip(frames, frames[1:])):
#     # Note: it would be faster to predict batches of flows instead of individual flows
#     img1, img2 = preprocess(img1, img2)

#     list_of_flows = model(img1.to(device), img2.to(device))
#     predicted_flow = list_of_flows[-1][0]
#     flow_img = flow_to_image(predicted_flow).to("cpu")
#     output_folder = "/tmp/"  # Update this to the folder of your choice
#     write_jpeg(flow_img, output_folder + f"predicted_flow_{i}.jpg")
一旦儲存了 .jpg 光流圖像,您可以使用 ffmpeg 將它們轉換為影片或 GIF,例如:
ffmpeg -f image2 -framerate 30 -i predicted_flow_%d.jpg -loop -1 flow.gif
腳本總執行時間:(0 分鐘 8.912 秒)
