開始使用 transforms v2
此範例說明了您需要知道的所有內容,才能開始使用新的 torchvision.transforms.v2 API。我們將涵蓋簡單的任務,如影像分類,以及更進階的任務,如物件偵測 / 分割。
首先,進行一些設定
from pathlib import Path
import torch
import matplotlib.pyplot as plt
plt.rcParams["savefig.bbox"] = 'tight'

from torchvision.transforms import v2
from torchvision.io import decode_image

torch.manual_seed(1)

# If you're trying to run that on Colab, you can download the assets and the
# helpers from https://github.com/pytorch/vision/tree/main/gallery/
from helpers import plot
img = decode_image(str(Path('../assets') / 'astronaut.jpg'))
print(f"{type(img) = }, {img.dtype = }, {img.shape = }")
type(img) = <class 'torch.Tensor'>, img.dtype = torch.uint8, img.shape = torch.Size([3, 512, 512])
基礎知識
Torchvision transforms 的行為就像一個常規的 torch.nn.Module(事實上,它們中的大多數都是):實例化一個 transform,傳入一個輸入,得到一個轉換後的輸出
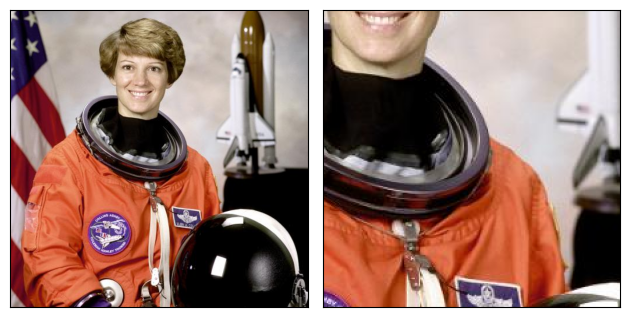
transform = v2.RandomCrop(size=(224, 224))
out = transform(img)

plot([img, out])
我只想做影像分類
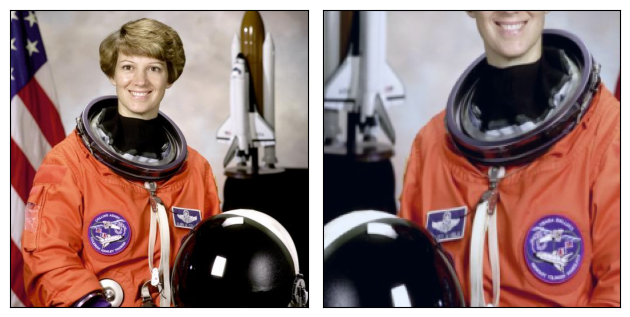
如果您只關心影像分類,事情就非常簡單。一個基本的分類管線可能看起來像這樣
transforms = v2.Compose([
    v2.RandomResizedCrop(size=(224, 224), antialias=True),
    v2.RandomHorizontalFlip(p=0.5),
    v2.ToDtype(torch.float32, scale=True),
    v2.Normalize(mean=[0.485, 0.456, 0.406], std=[0.229, 0.224, 0.225]),
])
out = transforms(img)

plot([img, out])
這樣的轉換管線通常作為 transform 參數傳遞給 資料集,例如 ImageNet(..., transform=transforms)。
基本上就是這樣。從那裡開始,閱讀我們的 主要文件,以了解更多關於推薦做法和約定,或探索更多 範例,例如如何使用擴增轉換,如 CutMix 和 MixUp。
注意
如果您已經在使用 torchvision.transforms v1 API,我們建議您切換到新的 v2 transforms。這非常簡單:v2 transforms 完全與 v1 API 相容,所以您只需要更改 import 語法即可!
偵測、分割、影片
torchvision.transforms.v2 命名空間中的新 Torchvision transforms 支援圖像分類以外的任務:它們還可以轉換邊界框、分割/偵測遮罩或影片。
讓我們簡要地看一下帶有邊界框的偵測範例。
from torchvision import tv_tensors  # we'll describe this a bit later, bare with us

boxes = tv_tensors.BoundingBoxes(
    [
        [15, 10, 370, 510],
        [275, 340, 510, 510],
        [130, 345, 210, 425]
    ],
    format="XYXY", canvas_size=img.shape[-2:])

transforms = v2.Compose([
    v2.RandomResizedCrop(size=(224, 224), antialias=True),
    v2.RandomPhotometricDistort(p=1),
    v2.RandomHorizontalFlip(p=1),
])
out_img, out_boxes = transforms(img, boxes)
print(type(boxes), type(out_boxes))

plot([(img, boxes), (out_img, out_boxes)])
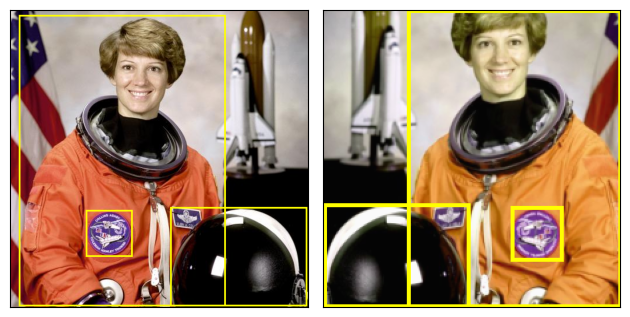
<class 'torchvision.tv_tensors._bounding_boxes.BoundingBoxes'> <class 'torchvision.tv_tensors._bounding_boxes.BoundingBoxes'>
上面的範例重點在於物件偵測。但是,如果我們有物件分割或語義分割的遮罩(torchvision.tv_tensors.Mask)或影片(torchvision.tv_tensors.Video),我們可以完全以相同的方式將它們傳遞給 transforms。
到目前為止,您可能有一些問題:什麼是這些 TVTensors?我們如何使用它們?以及這些 transforms 的預期輸入/輸出是什麼?我們將在接下來的章節中回答這些問題。
什麼是 TVTensors?
TVTensors 是 torch.Tensor 的子類別。可用的 TVTensors 包括 Image、BoundingBoxes、Mask 和 Video。
TVTensors 看起來和感覺起來就像普通的 tensors - 它們**就是** tensors。所有在普通 torch.Tensor 上支援的操作,例如 .sum() 或任何 torch.* 運算符,也將在 TVTensor 上工作。
img_dp = tv_tensors.Image(torch.randint(0, 256, (3, 256, 256), dtype=torch.uint8))

print(f"{isinstance(img_dp, torch.Tensor) = }")
print(f"{img_dp.dtype = }, {img_dp.shape = }, {img_dp.sum() = }")
isinstance(img_dp, torch.Tensor) = True
img_dp.dtype = torch.uint8, img_dp.shape = torch.Size([3, 256, 256]), img_dp.sum() = tensor(25087958)
這些 TVTensor 類別是 transforms 的核心:為了轉換給定的輸入,transforms 首先查看物件的**類別**,並相應地分派到適當的實作。
您不需要在此時了解太多關於 TVTensors 的資訊,但想要了解更多的進階使用者可以參考 TVTensors 常見問題。
我應該傳遞什麼作為輸入?
上面,我們看到了兩個範例:一個是我們傳遞單個圖像作為輸入,即 out = transforms(img),另一個是我們同時傳遞圖像和邊界框,即 out_img, out_boxes = transforms(img, boxes)。
事實上,transforms 支援**任意的輸入結構**。輸入可以是單個圖像、元組、任意巢狀的字典……幾乎任何東西。相同的結構將作為輸出返回。下面,我們使用相同的偵測 transforms,但傳遞一個元組 (image, target_dict) 作為輸入,我們得到與輸出相同的結構。
target = {
    "boxes": boxes,
    "labels": torch.arange(boxes.shape[0]),
    "this_is_ignored": ("arbitrary", {"structure": "!"})
}

# Re-using the transforms and definitions from above.
out_img, out_target = transforms(img, target)

plot([(img, target["boxes"]), (out_img, out_target["boxes"])])
print(f"{out_target['this_is_ignored']}")
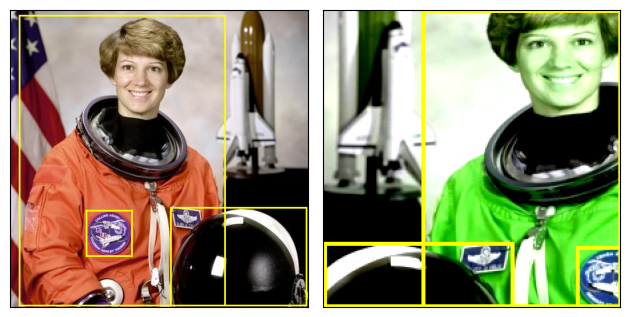
('arbitrary', {'structure': '!'})
我們傳遞了一個元組,所以我們得到一個元組,第二個元素是轉換後的 target dict。 Transforms 實際上並不關心輸入的結構;如上所述,它們只關心物件的**類型**,並相應地轉換它們。
像字串或整數這樣的*外部*物件只是被直接傳遞。這可能很有用,例如,如果您想在偵錯時將路徑與每個樣本關聯起來!
注意
**免責聲明** 此註釋稍微進階,可以在第一次閱讀時安全地跳過。
一般的,純 torch.Tensor 物件被視為圖像(或者對於影片特定的 transforms,則被視為影片)。實際上,您可能已經注意到,在上面的程式碼中,我們根本沒有使用 Image 類別,但我們的圖像仍然被正確轉換。 Transforms 遵循以下邏輯來確定是否應將純 Tensor 視為圖像(或影片),或者只是忽略它。
如果輸入中有
Image、Video或PIL.Image.Image實例,則所有其他純 tensors 都會被直接傳遞。如果沒有
Image或Video實例,則只有第一個純torch.Tensor將被轉換為圖像或影片,而所有其他 tensors 都會被直接傳遞。 這裡“第一個”是指“深度優先遍歷中的第一個”。
這就是上面偵測範例中發生的情況:第一個純 tensor 是圖像,因此它被正確轉換,並且所有其他純 tensor 實例(如 labels)都被直接傳遞(儘管 labels 仍然可以被某些 transforms(如 SanitizeBoundingBoxes!)轉換)。
Transforms 和 Datasets 的互容性
粗略地說,datasets 的輸出必須對應於 transforms 的輸入。如何做到這一點取決於您是使用 torchvision 內建的 datasets,還是您自己的自訂 datasets。
使用內建的 datasets
如果您只是在做圖像分類,則無需做任何事情。只需使用 dataset 的 transform 參數,例如 ImageNet(..., transform=transforms),就可以開始了。
Torchvision 也支援物件偵測或分割的資料集,例如 torchvision.datasets.CocoDetection。這些資料集早於 torchvision.transforms.v2 模組和 TVTensor 的存在,因此它們預設不會回傳 TVTensor。
要強制這些資料集回傳 TVTensor 並使其與 v2 轉換相容的簡單方法是使用 torchvision.datasets.wrap_dataset_for_transforms_v2() 函式。
from torchvision.datasets import CocoDetection, wrap_dataset_for_transforms_v2

dataset = CocoDetection(..., transforms=my_transforms)
dataset = wrap_dataset_for_transforms_v2(dataset)
# Now the dataset returns TVTensors!
使用您自己的資料集
如果您有自訂資料集,則需要將物件轉換為適當的 TVTensor 類別。建立 TVTensor 實例非常容易,詳情請參閱 我該如何建立 TVTensor?。
您可以在兩個主要地方實作該轉換邏輯:
在資料集的
__getitem__方法的結尾,在回傳樣本之前(或透過子類別化資料集)。作為轉換流程的第一步。
無論哪種方式,邏輯都取決於您的特定資料集。
腳本總執行時間: (0 分鐘 0.685 秒)
