如何執行 DistributedDataParallel (DDP)
本文檔說明如何在 xla 中使用 torch.nn.parallel.DistributedDataParallel,並進一步描述其與原生 xla 資料平行處理方法的差異。您可以在此處找到最小可執行範例。
背景 / 動機
長期以來,客戶一直要求能夠將 PyTorch 的 DistributedDataParallel API 與 xla 一起使用。我們在此將其作為實驗性功能啟用。
如何使用 DistributedDataParallel
對於那些從 PyTorch eager 模式切換到 XLA 的使用者,以下是將您的 eager DDP 模型轉換為 XLA 模型所需進行的所有變更。我們假設您已經知道如何在單一裝置上使用 XLA。
匯入 xla 特定分散式套件
import torch_xla
import torch_xla.runtime as xr
import torch_xla.distributed.xla_backend
初始化 xla 處理程序群組,類似於其他處理程序群組,例如 nccl 和 gloo。
dist.init_process_group("xla", rank=rank, world_size=world_size)
如果您需要,請使用 xla 特定 API 來取得 rank 和 world_size。
new_rank = xr.global_ordinal()
world_size = xr.world_size()
使用 DDP 包裝模型。
ddp_model = DDP(model, gradient_as_bucket_view=True)
最後使用 xla 特定啟動器啟動您的模型。
torch_xla.launch(demo_fn)
我們在此將所有內容整合在一起 (範例實際上取自DDP 教學)。您編寫程式碼的方式與 eager 體驗非常相似。只需在單一裝置上進行 xla 特定調整,再加上對腳本進行上述五項變更即可。
import os
import sys
import tempfile
import torch
import torch.distributed as dist
import torch.nn as nn
import torch.optim as optim

from torch.nn.parallel import DistributedDataParallel as DDP

# additional imports for xla
import torch_xla
import torch_xla.core.xla_model as xm
import torch_xla.runtime as xr
import torch_xla.distributed.xla_backend

def setup(rank, world_size):
    os.environ['PJRT_DEVICE'] = 'TPU'

    # initialize the xla process group
    dist.init_process_group("xla", rank=rank, world_size=world_size)

def cleanup():
    dist.destroy_process_group()

class ToyModel(nn.Module):
    def __init__(self):
        super(ToyModel, self).__init__()
        self.net1 = nn.Linear(10, 1000000)
        self.relu = nn.ReLU()
        self.net2 = nn.Linear(1000000, 5)

    def forward(self, x):
        return self.net2(self.relu(self.net1(x)))

def demo_basic(rank):
    # xla specific APIs to get rank, world_size.
    new_rank = xr.global_ordinal()
    assert new_rank == rank
    world_size = xr.world_size()

    print(f"Running basic DDP example on rank {rank}.")
    setup(rank, world_size)

    # create model and move it to XLA device
    device = xm.xla_device()
    model = ToyModel().to(device)
    ddp_model = DDP(model, gradient_as_bucket_view=True)

    loss_fn = nn.MSELoss()
    optimizer = optim.SGD(ddp_model.parameters(), lr=0.001)

    optimizer.zero_grad()
    outputs = ddp_model(torch.randn(20, 10).to(device))
    labels = torch.randn(20, 5).to(device)
    loss_fn(outputs, labels).backward()
    optimizer.step()
    # xla specific API to execute the graph
    xm.mark_step()

    cleanup()


def run_demo(demo_fn):
    # xla specific launcher
    torch_xla.launch(demo_fn)

if __name__ == "__main__":
    run_demo(demo_basic)
基準測試
使用假資料的 Resnet50
以下結果是透過在 TPU VM V3-8 環境中使用 ToT PyTorch 和 PyTorch/XLA 的命令收集的
python test/test_train_mp_imagenet.py --fake_data --model=resnet50 --num_epochs=1
統計指標是使用此 pull request中的腳本產生的。速率單位為每秒影像數。
| 類型 | 平均值 | 中位數 | 第 90 百分位 | 標準差 | CV |
|---|---|---|---|---|---|
| xm.optimizer_step | 418.54 | 419.22 | 430.40 | 9.76 | 0.02 |
| DDP | 395.97 | 395.54 | 407.13 | 7.60 | 0.02 |
我們的原生分散式資料平行處理方法與 DistributedDataParallel 包裝器之間的效能差異為:1 - 395.97 / 418.54 = 5.39%。考慮到 DDP 包裝器在追蹤 DDP 運行時引入了額外的開銷,這個結果似乎是合理的。
使用假資料的 MNIST
以下結果是透過在 TPU VM V3-8 環境中使用 ToT PyTorch 和 PyTorch/XLA 的命令:python test/test_train_mp_mnist.py --fake_data 收集的。統計指標是使用此 pull request中的腳本產生的。速率單位為每秒影像數。
| 類型 | 平均值 | 中位數 | 第 90 百分位 | 標準差 | CV |
|---|---|---|---|---|---|
| xm.optimizer_step | 17864.19 | 20108.96 | 24351.74 | 5866.83 | 0.33 |
| DDP | 10701.39 | 11770.00 | 14313.78 | 3102.92 | 0.29 |
我們的原生分散式資料平行處理方法與 DistributedDataParallel 包裝器之間的效能差異為:1 - 14313.78 / 24351.74 = 41.22%。由於資料集很小,且前幾輪受到資料載入的嚴重影響,因此我們在此比較第 90 百分位。這種速度減慢幅度很大,但考慮到模型很小,這是合理的。額外的 DDP 運行時追蹤開銷很難攤銷。
使用真實資料的 MNIST
以下結果是在 TPU VM V3-8 環境中使用 ToT PyTorch 和 PyTorch/XLA 的命令 n 收集的
python test/test_train_mp_mnist.py --logdir mnist/ o.
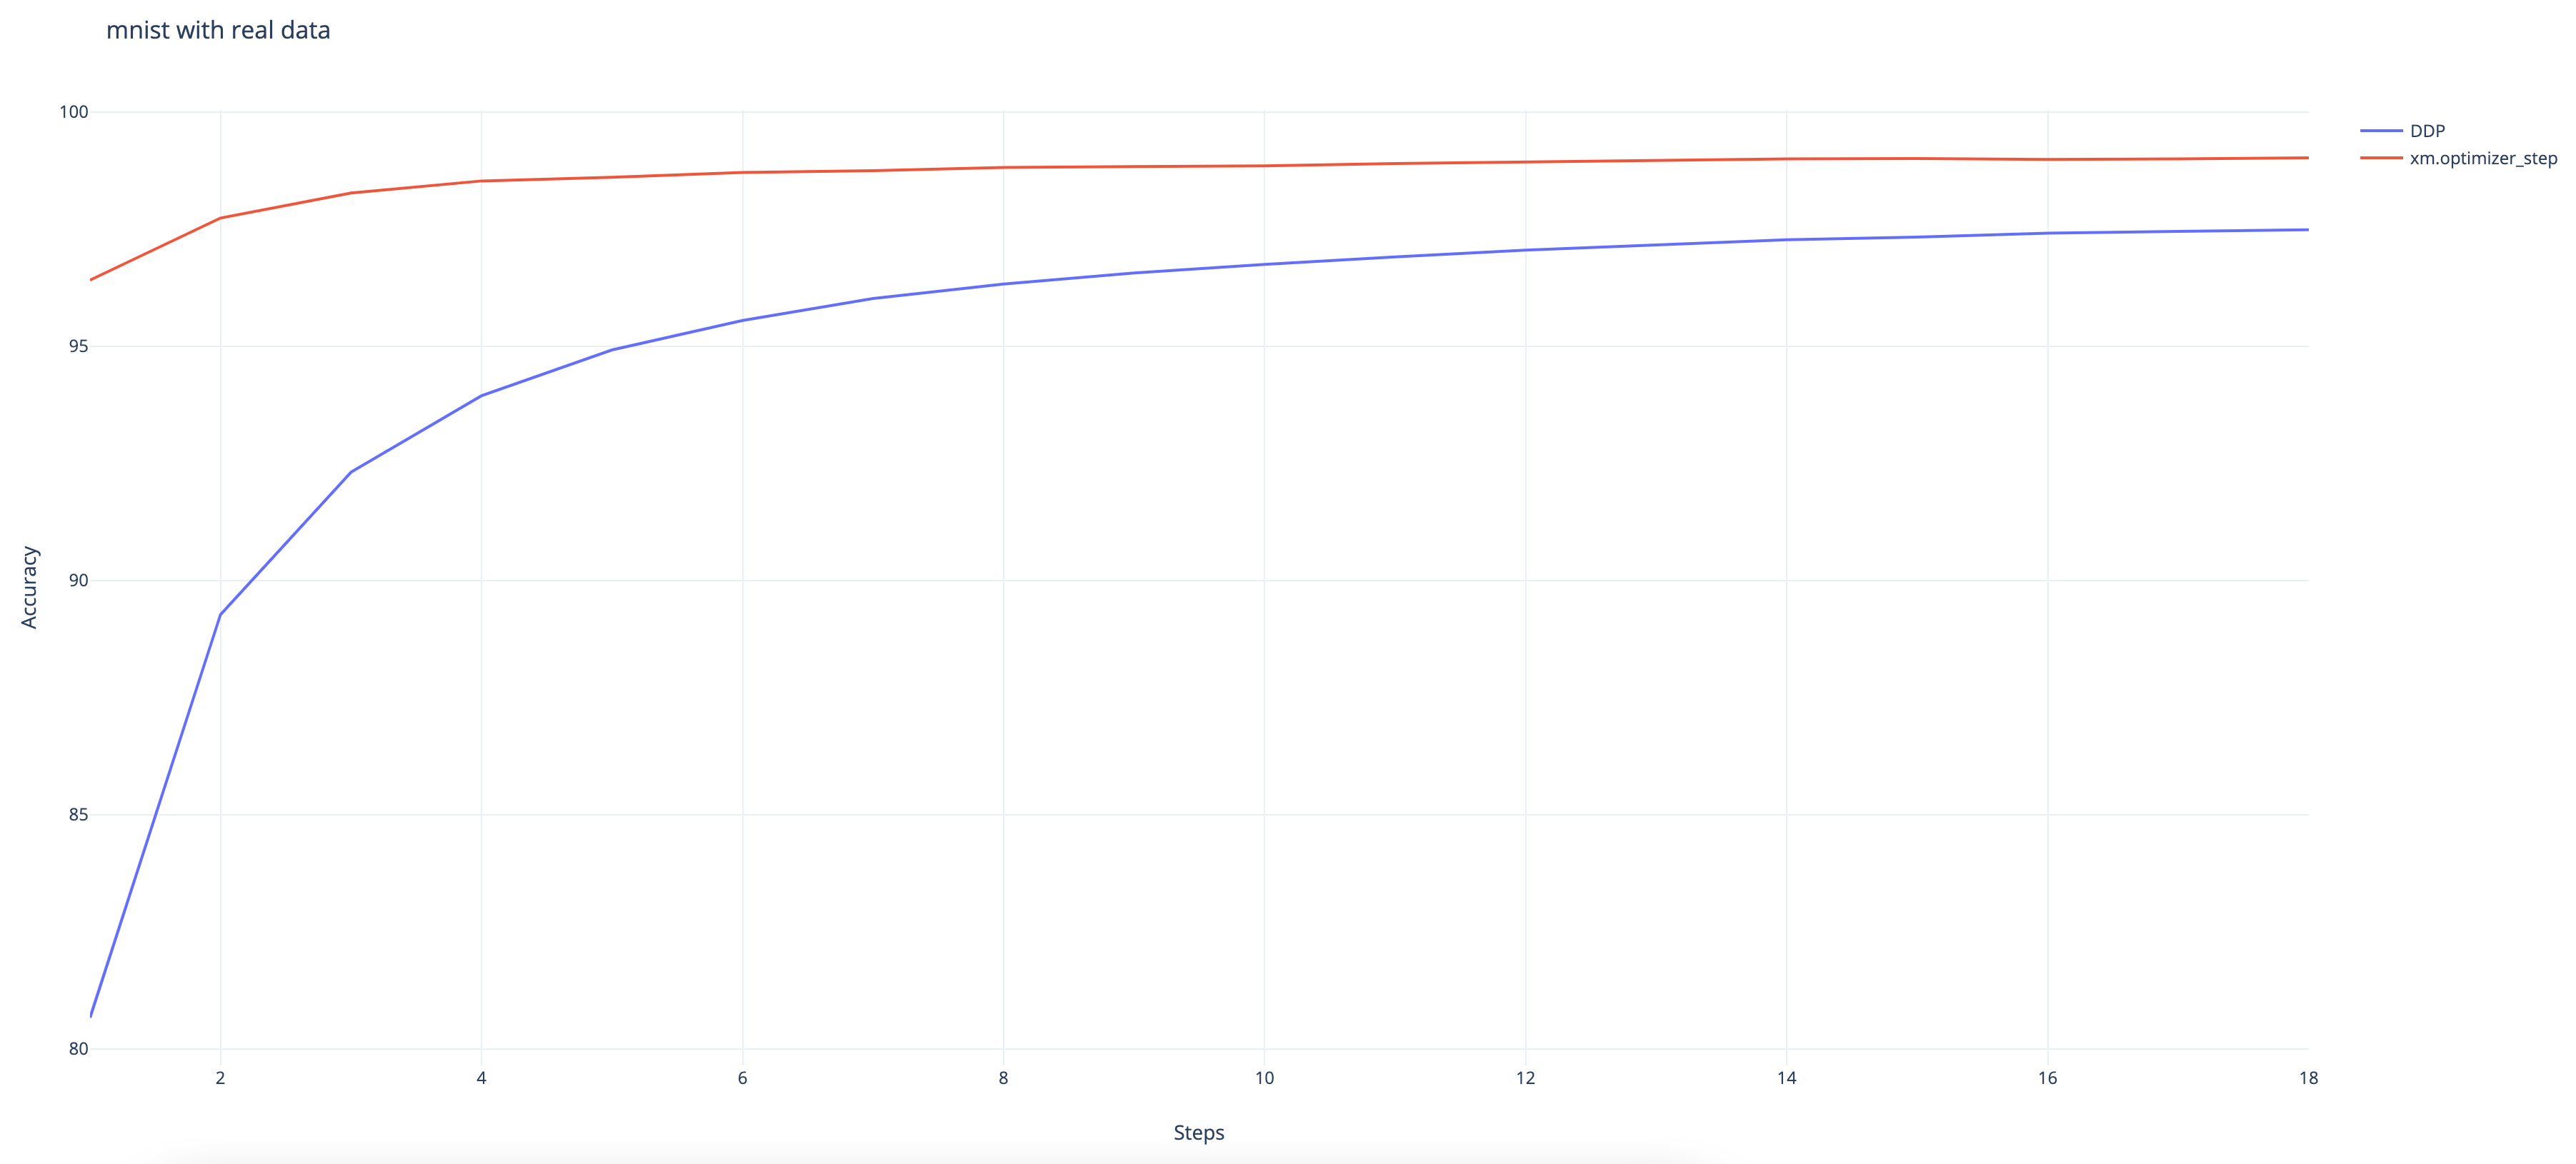
我們可以觀察到,即使 DDP 包裝器最終仍達到 97.48% 的高準確率,但其收斂速度仍比原生 XLA 方法慢。(原生方法達到 99%。)
免責聲明
此功能仍為實驗性功能,且正在積極開發中。請謹慎使用,並隨時向xla github 儲存庫提交任何錯誤。對於那些對原生 xla 資料平行處理方法感興趣的人,這是教學。
以下是一些正在調查中的已知問題:* 與 torch.utils.data.DataLoader 一起使用時存在一些問題。使用真實資料的 test_train_mp_mnist.py 在退出前崩潰。
