


注意
按一下此處以下載完整的範例程式碼
音訊 I/O
作者:Moto Hira
本教學課程示範如何使用 TorchAudio 的基本 I/O API 來檢查音訊資料、將其載入 PyTorch 張量並儲存 PyTorch 張量。
警告
在最近的版本中,音訊 I/O 計劃/進行了多項變更。有關這些變更的詳細資訊,請參閱Dispatcher 簡介。
import torch
import torchaudio

print(torch.__version__)
print(torchaudio.__version__)
2.6.0
2.6.0
準備工作
首先,我們匯入模組並下載本教學課程中使用的音訊資產。
注意
在 Google Colab 中執行本教學課程時,請使用以下指令安裝所需的套件
!pip install boto3
import io
import os
import tarfile
import tempfile

import boto3
import matplotlib.pyplot as plt
import requests
from botocore import UNSIGNED
from botocore.config import Config
from IPython.display import Audio
from torchaudio.utils import download_asset

SAMPLE_GSM = download_asset("tutorial-assets/steam-train-whistle-daniel_simon.gsm")
SAMPLE_WAV = download_asset("tutorial-assets/Lab41-SRI-VOiCES-src-sp0307-ch127535-sg0042.wav")
SAMPLE_WAV_8000 = download_asset("tutorial-assets/Lab41-SRI-VOiCES-src-sp0307-ch127535-sg0042-8000hz.wav")


def _hide_seek(obj):
    class _wrapper:
        def __init__(self, obj):
            self.obj = obj

        def read(self, n):
            return self.obj.read(n)

    return _wrapper(obj)
  0%|          | 0.00/7.99k [00:00<?, ?B/s]
100%|##########| 7.99k/7.99k [00:00<00:00, 14.5MB/s]

  0%|          | 0.00/53.2k [00:00<?, ?B/s]
100%|##########| 53.2k/53.2k [00:00<00:00, 48.4MB/s]
查詢音訊元資料
函式 torchaudio.info() 擷取音訊元資料。您可以提供類似路徑的物件或類似檔案的物件。
metadata = torchaudio.info(SAMPLE_WAV)
print(metadata)
AudioMetaData(sample_rate=16000, num_frames=54400, num_channels=1, bits_per_sample=16, encoding=PCM_S)
其中
sample_rate是音訊的取樣率num_channels是通道數量num_frames是每個通道的影格數量bits_per_sample是位元深度encoding是取樣編碼格式
encoding 可以採用以下值之一
"PCM_S":帶正負號的整數線性 PCM"PCM_U":無符號整數線性 PCM"PCM_F":浮點數線性 PCM"FLAC":Flac,Free Lossless Audio Codec(無損音訊編碼)"ULAW":Mu-law(μ-law),[wikipedia]"ALAW":A-law,[wikipedia]"MP3":MP3,MPEG-1 Audio Layer III"VORBIS":OGG Vorbis,[xiph.org]"AMR_NB":Adaptive Multi-Rate(自適應多速率),[wikipedia]"AMR_WB":Adaptive Multi-Rate Wideband(自適應多速率寬頻),[wikipedia]"OPUS":Opus,[opus-codec.org]"GSM":GSM-FR,[wikipedia]"HTK":單聲道 16 位元 PCM"UNKNOWN":以上皆非
注意
bits_per_sample對於具有壓縮和/或可變位元率的格式(例如 MP3)可以是0。num_frames對於 GSM-FR 格式可以是0。
metadata = torchaudio.info(SAMPLE_GSM)
print(metadata)
AudioMetaData(sample_rate=8000, num_frames=39680, num_channels=1, bits_per_sample=0, encoding=GSM)
查詢類似檔案的物件
torchaudio.info() 可用於類似檔案的物件。
AudioMetaData(sample_rate=44100, num_frames=109368, num_channels=2, bits_per_sample=16, encoding=PCM_S)
注意
當傳遞類似檔案的物件時,info 並不會讀取所有底層資料;而是僅從開頭讀取部分資料。 因此,對於給定的音訊格式,它可能無法檢索到正確的元數據,包括格式本身。 在這種情況下,您可以傳遞 format 參數來指定音訊的格式。
載入音訊資料
若要載入音訊資料,您可以使用 torchaudio.load()。
此函式接受類似路徑的物件或類似檔案的物件作為輸入。
傳回的值是波形 (Tensor) 和取樣率 (int) 的元組。
預設情況下,產生的 tensor 物件具有 dtype=torch.float32,其值範圍是 [-1.0, 1.0]。
如需支援的格式清單,請參閱 torchaudio 文件。
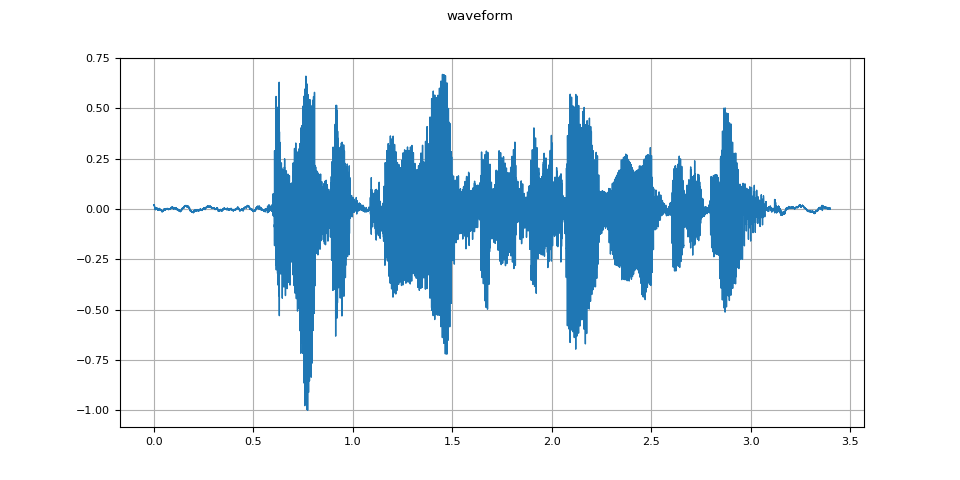
waveform, sample_rate = torchaudio.load(SAMPLE_WAV)
def plot_waveform(waveform, sample_rate):
    waveform = waveform.numpy()

    num_channels, num_frames = waveform.shape
    time_axis = torch.arange(0, num_frames) / sample_rate

    figure, axes = plt.subplots(num_channels, 1)
    if num_channels == 1:
        axes = [axes]
    for c in range(num_channels):
        axes[c].plot(time_axis, waveform[c], linewidth=1)
        axes[c].grid(True)
        if num_channels > 1:
            axes[c].set_ylabel(f"Channel {c+1}")
    figure.suptitle("waveform")
plot_waveform(waveform, sample_rate)
def plot_specgram(waveform, sample_rate, title="Spectrogram"):
    waveform = waveform.numpy()

    num_channels, num_frames = waveform.shape

    figure, axes = plt.subplots(num_channels, 1)
    if num_channels == 1:
        axes = [axes]
    for c in range(num_channels):
        axes[c].specgram(waveform[c], Fs=sample_rate)
        if num_channels > 1:
            axes[c].set_ylabel(f"Channel {c+1}")
    figure.suptitle(title)
plot_specgram(waveform, sample_rate)

Audio(waveform.numpy()[0], rate=sample_rate)
從類似檔案的物件載入
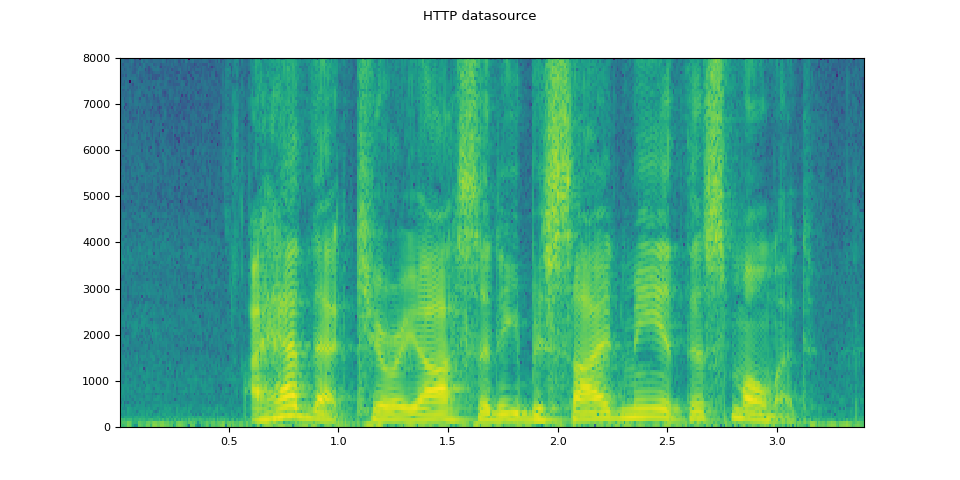
I/O 函式支援類似檔案的物件。 這允許從本地檔案系統內和之外的位置提取和解碼音訊資料。 以下範例說明了這一點。
# Load audio data as HTTP request
url = "https://download.pytorch.org/torchaudio/tutorial-assets/Lab41-SRI-VOiCES-src-sp0307-ch127535-sg0042.wav"
with requests.get(url, stream=True) as response:
    waveform, sample_rate = torchaudio.load(_hide_seek(response.raw))
plot_specgram(waveform, sample_rate, title="HTTP datasource")
# Load audio from tar file
tar_path = download_asset("tutorial-assets/VOiCES_devkit.tar.gz")
tar_item = "VOiCES_devkit/source-16k/train/sp0307/Lab41-SRI-VOiCES-src-sp0307-ch127535-sg0042.wav"
with tarfile.open(tar_path, mode="r") as tarfile_:
    fileobj = tarfile_.extractfile(tar_item)
    waveform, sample_rate = torchaudio.load(fileobj)
plot_specgram(waveform, sample_rate, title="TAR file")

  0%|          | 0.00/110k [00:00<?, ?B/s]
100%|##########| 110k/110k [00:00<00:00, 43.5MB/s]
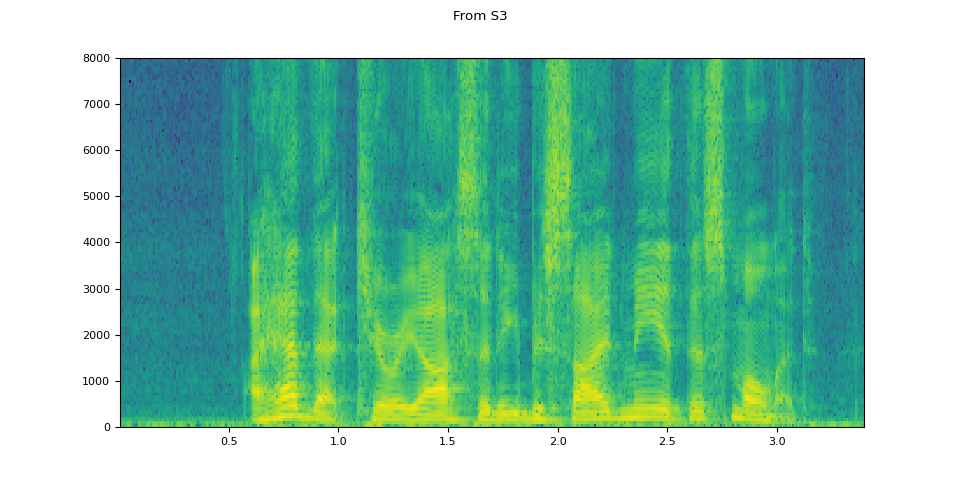
# Load audio from S3
bucket = "pytorch-tutorial-assets"
key = "VOiCES_devkit/source-16k/train/sp0307/Lab41-SRI-VOiCES-src-sp0307-ch127535-sg0042.wav"
client = boto3.client("s3", config=Config(signature_version=UNSIGNED))
response = client.get_object(Bucket=bucket, Key=key)
waveform, sample_rate = torchaudio.load(_hide_seek(response["Body"]))
plot_specgram(waveform, sample_rate, title="From S3")
關於切片的提示
提供 num_frames 和 frame_offset 參數會將解碼限制為輸入的對應區段。
可以使用標準 Tensor 切片來實現相同的結果,(即 waveform[:, frame_offset:frame_offset+num_frames])。 但是,提供 num_frames 和 frame_offset 參數更有效率。
這是因為該函式會在完成請求的幀的解碼後結束資料採集和解碼。 當音訊資料透過網路傳輸時,這是有利的,因為資料傳輸將在獲取必要數量的資料後立即停止。
以下範例說明了這一點。
# Illustration of two different decoding methods.
# The first one will fetch all the data and decode them, while
# the second one will stop fetching data once it completes decoding.
# The resulting waveforms are identical.

frame_offset, num_frames = 16000, 16000  # Fetch and decode the 1 - 2 seconds

url = "https://download.pytorch.org/torchaudio/tutorial-assets/Lab41-SRI-VOiCES-src-sp0307-ch127535-sg0042.wav"
print("Fetching all the data...")
with requests.get(url, stream=True) as response:
    waveform1, sample_rate1 = torchaudio.load(_hide_seek(response.raw))
    waveform1 = waveform1[:, frame_offset : frame_offset + num_frames]
    print(f" - Fetched {response.raw.tell()} bytes")

print("Fetching until the requested frames are available...")
with requests.get(url, stream=True) as response:
    waveform2, sample_rate2 = torchaudio.load(
        _hide_seek(response.raw), frame_offset=frame_offset, num_frames=num_frames
    )
    print(f" - Fetched {response.raw.tell()} bytes")

print("Checking the resulting waveform ... ", end="")
assert (waveform1 == waveform2).all()
print("matched!")
Fetching all the data...
 - Fetched 108844 bytes
Fetching until the requested frames are available...
 - Fetched 108844 bytes
Checking the resulting waveform ... matched!
將音訊儲存到檔案
若要將音訊資料儲存為常見應用程式可解釋的格式,您可以使用 torchaudio.save()。
此函式接受類似路徑的物件或類似檔案的物件。
當傳遞類似檔案的物件時,您還需要提供參數 format,以便函式知道應使用哪種格式。 在類似路徑物件的情況下,該函式將從副檔名推斷格式。 如果您要儲存到沒有副檔名的檔案,則需要提供參數 format。
儲存 WAV 格式的資料時,float32 Tensor 的預設編碼是 32 位元浮點 PCM。 您可以提供參數 encoding 和 bits_per_sample 來變更此行為。 例如,若要以 16 位元帶符號整數 PCM 儲存資料,您可以執行以下操作。
注意
以較低位元深度的編碼儲存資料會減少產生的檔案大小,但也會降低精確度。
waveform, sample_rate = torchaudio.load(SAMPLE_WAV)
def inspect_file(path):
    print("-" * 10)
    print("Source:", path)
    print("-" * 10)
    print(f" - File size: {os.path.getsize(path)} bytes")
    print(f" - {torchaudio.info(path)}")
    print()
儲存時不使用任何編碼選項。 函式將選擇提供的資料適合的編碼
with tempfile.TemporaryDirectory() as tempdir:
    path = f"{tempdir}/save_example_default.wav"
    torchaudio.save(path, waveform, sample_rate)
    inspect_file(path)
----------
Source: /tmp/tmpu65i6inj/save_example_default.wav
----------
 - File size: 108878 bytes
 - AudioMetaData(sample_rate=16000, num_frames=54400, num_channels=1, bits_per_sample=16, encoding=PCM_S)
儲存為 16 位元帶符號整數線性 PCM。 產生的檔案佔用一半的儲存空間,但會失去精確度
with tempfile.TemporaryDirectory() as tempdir:
    path = f"{tempdir}/save_example_PCM_S16.wav"
    torchaudio.save(path, waveform, sample_rate, encoding="PCM_S", bits_per_sample=16)
    inspect_file(path)
----------
Source: /tmp/tmp9xxqlowd/save_example_PCM_S16.wav
----------
 - File size: 108878 bytes
 - AudioMetaData(sample_rate=16000, num_frames=54400, num_channels=1, bits_per_sample=16, encoding=PCM_S)
torchaudio.save() 也可以處理其他格式。 僅舉幾例
formats = [
    "flac",
    # "vorbis",
    # "sph",
    # "amb",
    # "amr-nb",
    # "gsm",
]
waveform, sample_rate = torchaudio.load(SAMPLE_WAV_8000)
with tempfile.TemporaryDirectory() as tempdir:
    for format in formats:
        path = f"{tempdir}/save_example.{format}"
        torchaudio.save(path, waveform, sample_rate, format=format)
        inspect_file(path)
----------
Source: /tmp/tmpjayiu4jz/save_example.flac
----------
 - File size: 45262 bytes
 - AudioMetaData(sample_rate=8000, num_frames=27200, num_channels=1, bits_per_sample=16, encoding=FLAC)
儲存到類似檔案的物件
與其他 I/O 函式類似,您可以將音訊儲存到類似檔案的物件。 儲存到類似檔案的物件時,需要參數 format。
waveform, sample_rate = torchaudio.load(SAMPLE_WAV)

# Saving to bytes buffer
buffer_ = io.BytesIO()
torchaudio.save(buffer_, waveform, sample_rate, format="wav")

buffer_.seek(0)
print(buffer_.read(16))
b'RIFFF\xa9\x01\x00WAVEfmt '
腳本的總執行時間:(0 分鐘 1.906 秒)
