


注意
點擊這裡下載完整的範例程式碼
使用 NVDEC 加速影片解碼
作者: Moto Hira
本教學課程展示如何將 NVIDIA 的硬體影片解碼器 (NVDEC) 與 TorchAudio 搭配使用,以及它如何改善影片解碼的效能。
import torch
import torchaudio

print(torch.__version__)
print(torchaudio.__version__)
2.6.0
2.6.0
import os
import time

import matplotlib.pyplot as plt
from torchaudio.io import StreamReader
檢查先決條件
首先,我們檢查 TorchAudio 是否正確偵測到支援 HW 解碼器/編碼器的 FFmpeg 函式庫。
from torchaudio.utils import ffmpeg_utils
FFmpeg Library versions:
  libavcodec:   60.3.100
  libavdevice:  60.1.100
  libavfilter:  9.3.100
  libavformat:  60.3.100
  libavutil:    58.2.100
Available NVDEC Decoders:
 - av1_cuvid
 - h264_cuvid
 - hevc_cuvid
 - mjpeg_cuvid
 - mpeg1_cuvid
 - mpeg2_cuvid
 - mpeg4_cuvid
 - vc1_cuvid
 - vp8_cuvid
 - vp9_cuvid
print("Avaialbe GPU:")
print(torch.cuda.get_device_properties(0))
Avaialbe GPU:
_CudaDeviceProperties(name='NVIDIA A10G', major=8, minor=6, total_memory=22502MB, multi_processor_count=80, uuid=3a6a8555-efc9-d0dc-972b-36624af6fad8, L2_cache_size=6MB)
我們將使用具有以下屬性的影片;
編碼器:H.264
解析度:960x540
FPS:29.97
像素格式:YUV420P
src = torchaudio.utils.download_asset(
    "tutorial-assets/stream-api/NASAs_Most_Scientifically_Complex_Space_Observatory_Requires_Precision-MP4_small.mp4"
)
  0%|          | 0.00/31.8M [00:00<?, ?B/s]
100%|##########| 31.8M/31.8M [00:00<00:00, 545MB/s]
使用 NVDEC 解碼影片
要使用 HW 影片解碼器,您需要在定義輸出影片串流時,透過將 decoder 選項傳遞給 add_video_stream() 方法來指定 HW 解碼器。
s = StreamReader(src)
s.add_video_stream(5, decoder="h264_cuvid")
s.fill_buffer()
(video,) = s.pop_chunks()
影片幀會被解碼並以 NCHW 格式的張量傳回。
print(video.shape, video.dtype)
torch.Size([5, 3, 540, 960]) torch.uint8
預設情況下,解碼後的幀會傳送回 CPU 記憶體,並建立 CPU 張量。
print(video.device)
cpu
透過指定 hw_accel 選項,您可以將解碼後的幀轉換為 CUDA 張量。hw_accel 選項接受字串值,並將其傳遞給 torch.device。
注意
目前,hw_accel 選項和 add_basic_video_stream() 不相容。add_basic_video_stream 會新增解碼後處理程序,該程序專為 CPU 記憶體中的幀而設計。請使用 add_video_stream()。
s = StreamReader(src)
s.add_video_stream(5, decoder="h264_cuvid", hw_accel="cuda:0")
s.fill_buffer()
(video,) = s.pop_chunks()

print(video.shape, video.dtype, video.device)
torch.Size([5, 3, 540, 960]) torch.uint8 cuda:0
注意
當有多個 GPU 可用時,StreamReader 預設會使用第一個 GPU。您可以透過提供 "gpu" 選項來變更此設定。
# Video data is sent to CUDA device 0, decoded and
# converted on the same device.
s.add_video_stream(
    ...,
    decoder="h264_cuvid",
    decoder_option={"gpu": "0"},
    hw_accel="cuda:0",
)
注意
"gpu" 選項和 hw_accel 選項可以獨立指定。如果兩者不匹配,解碼後的影格會自動傳輸到由 hw_accell 指定的裝置。
# Video data is sent to CUDA device 0, and decoded there.
# Then it is transfered to CUDA device 1, and converted to
# CUDA tensor.
s.add_video_stream(
    ...,
    decoder="h264_cuvid",
    decoder_option={"gpu": "0"},
    hw_accel="cuda:1",
)
視覺化
讓我們看看由硬體解碼器解碼的影格,並將其與軟體解碼器產生的等效結果進行比較。
以下函數會尋找指定的 timestamp 並使用指定的解碼器解碼一個影格。
def test_decode(decoder: str, seek: float):
    s = StreamReader(src)
    s.seek(seek)
    s.add_video_stream(1, decoder=decoder)
    s.fill_buffer()
    (video,) = s.pop_chunks()
    return video[0]
timestamps = [12, 19, 45, 131, 180]

cpu_frames = [test_decode(decoder="h264", seek=ts) for ts in timestamps]
cuda_frames = [test_decode(decoder="h264_cuvid", seek=ts) for ts in timestamps]
注意
目前,硬體解碼器不支援色彩空間轉換。解碼後的影格為 YUV 格式。以下函數執行 YUV 到 RGB 的轉換(以及用於繪圖的軸交換)。
def yuv_to_rgb(frames):
    frames = frames.cpu().to(torch.float)
    y = frames[..., 0, :, :]
    u = frames[..., 1, :, :]
    v = frames[..., 2, :, :]

    y /= 255
    u = u / 255 - 0.5
    v = v / 255 - 0.5

    r = y + 1.14 * v
    g = y + -0.396 * u - 0.581 * v
    b = y + 2.029 * u

    rgb = torch.stack([r, g, b], -1)
    rgb = (rgb * 255).clamp(0, 255).to(torch.uint8)
    return rgb.numpy()
現在我們將結果視覺化。
def plot():
    n_rows = len(timestamps)
    fig, axes = plt.subplots(n_rows, 2, figsize=[12.8, 16.0])
    for i in range(n_rows):
        axes[i][0].imshow(yuv_to_rgb(cpu_frames[i]))
        axes[i][1].imshow(yuv_to_rgb(cuda_frames[i]))

    axes[0][0].set_title("Software decoder")
    axes[0][1].set_title("HW decoder")
    plt.setp(axes, xticks=[], yticks=[])
    plt.tight_layout()


plot()
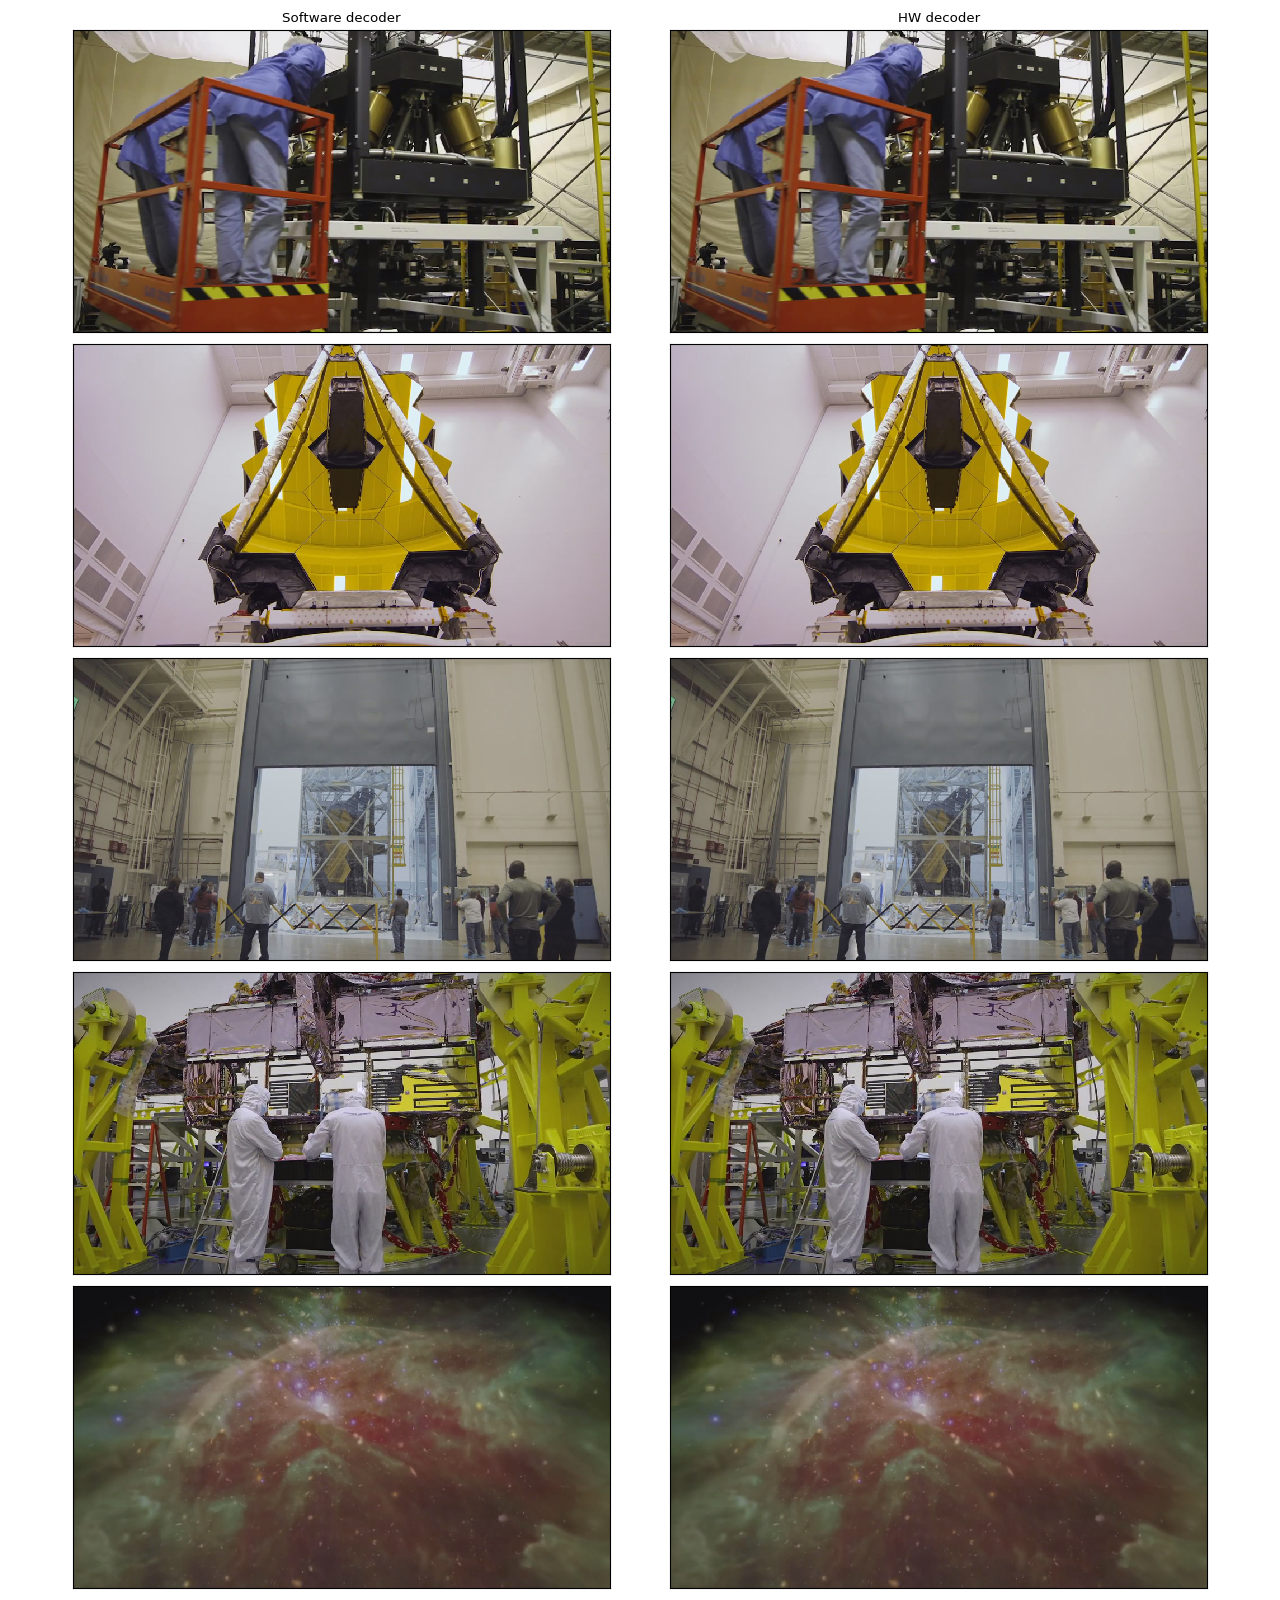
作者認為它們沒有區別。如果您發現任何問題,請隨時告訴我們。:)
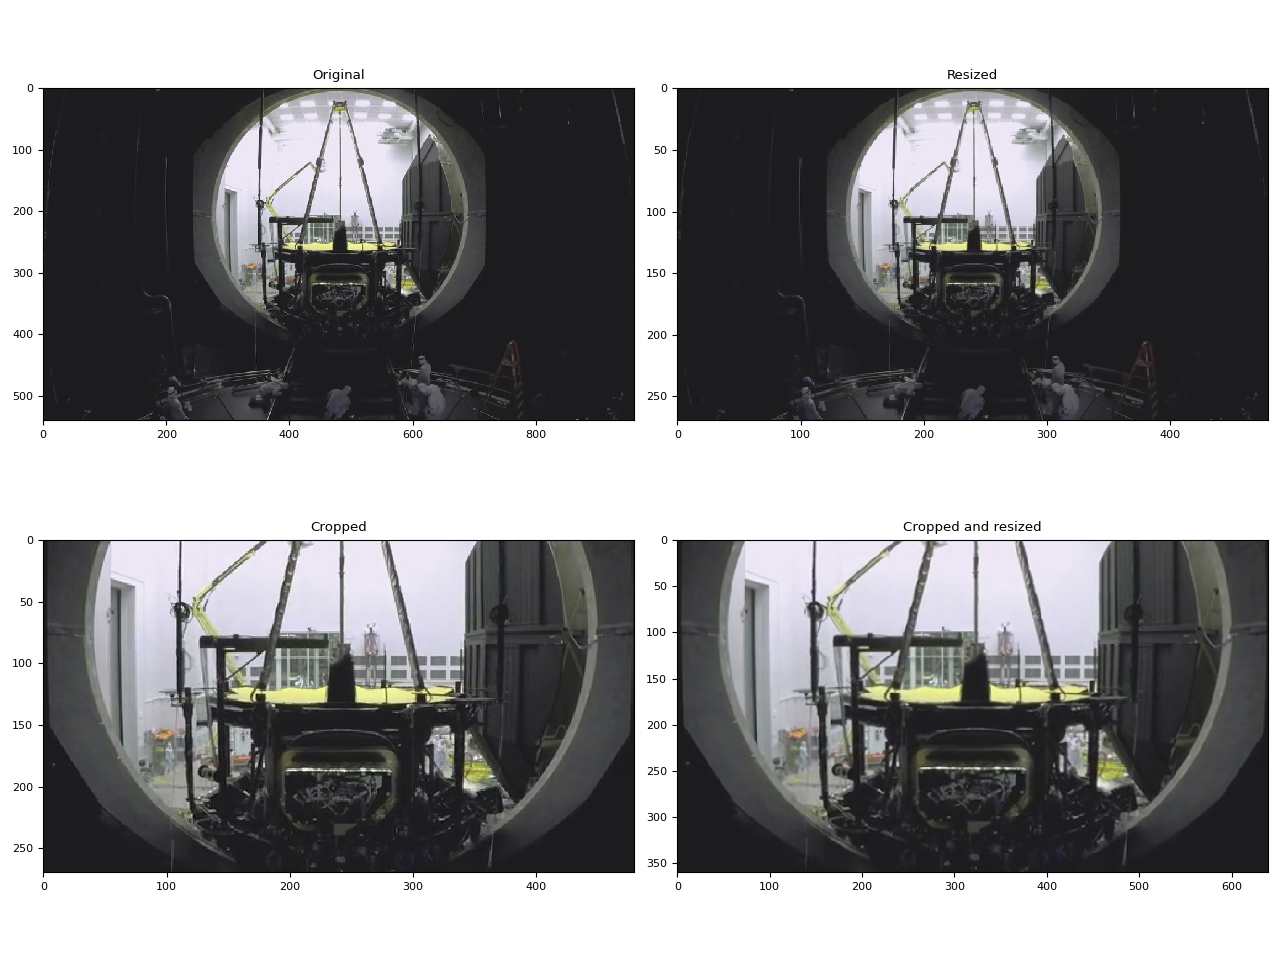
硬體調整大小和裁剪
您可以使用 decoder_option 參數來提供解碼器特定的選項。
以下選項通常與預處理相關。
resize:將影格調整為(寬度)x(高度)。crop:裁剪影格(頂部)x(底部)x(左側)x(右側)。請注意,指定的值是要移除的列/欄數量。最終影像大小為(寬度 - 左側 - 右側)x(高度 - 頂部 - 底部)。如果同時使用crop和resize選項,則先執行crop。
如需其他可用選項,請執行 ffmpeg -h decoder=h264_cuvid。
def test_options(option):
    s = StreamReader(src)
    s.seek(87)
    s.add_video_stream(1, decoder="h264_cuvid", hw_accel="cuda:0", decoder_option=option)
    s.fill_buffer()
    (video,) = s.pop_chunks()
    print(f"Option: {option}:\t{video.shape}")
    return video[0]
original = test_options(option=None)
resized = test_options(option={"resize": "480x270"})
cropped = test_options(option={"crop": "135x135x240x240"})
cropped_and_resized = test_options(option={"crop": "135x135x240x240", "resize": "640x360"})
Option: None:   torch.Size([1, 3, 540, 960])
Option: {'resize': '480x270'}:  torch.Size([1, 3, 270, 480])
Option: {'crop': '135x135x240x240'}:    torch.Size([1, 3, 270, 480])
Option: {'crop': '135x135x240x240', 'resize': '640x360'}:       torch.Size([1, 3, 360, 640])
def plot():
    fig, axes = plt.subplots(2, 2, figsize=[12.8, 9.6])
    axes[0][0].imshow(yuv_to_rgb(original))
    axes[0][1].imshow(yuv_to_rgb(resized))
    axes[1][0].imshow(yuv_to_rgb(cropped))
    axes[1][1].imshow(yuv_to_rgb(cropped_and_resized))

    axes[0][0].set_title("Original")
    axes[0][1].set_title("Resized")
    axes[1][0].set_title("Cropped")
    axes[1][1].set_title("Cropped and resized")
    plt.tight_layout()
    return fig


plot()
<Figure size 1280x960 with 4 Axes>
比較調整大小的方法
與軟體縮放不同,NVDEC 不提供選擇縮放演算法的選項。在 ML 應用中,通常需要構建具有相似數值屬性的預處理流程。因此,在這裡我們比較硬體調整大小與不同演算法的軟體調整大小的結果。
我們將使用以下影片,其中包含使用以下指令產生的測試圖案。
ffmpeg -y -f lavfi -t 12.05 -i mptestsrc -movflags +faststart mptestsrc.mp4
test_src = torchaudio.utils.download_asset("tutorial-assets/mptestsrc.mp4")
  0%|          | 0.00/232k [00:00<?, ?B/s]
100%|##########| 232k/232k [00:00<00:00, 41.6MB/s]
以下函數解碼影片並應用指定的縮放演算法。
def decode_resize_ffmpeg(mode, height, width, seek):
    filter_desc = None if mode is None else f"scale={width}:{height}:sws_flags={mode}"
    s = StreamReader(test_src)
    s.add_video_stream(1, filter_desc=filter_desc)
    s.seek(seek)
    s.fill_buffer()
    (chunk,) = s.pop_chunks()
    return chunk
以下函數使用硬體解碼器解碼影片並調整大小。
def decode_resize_cuvid(height, width, seek):
    s = StreamReader(test_src)
    s.add_video_stream(1, decoder="h264_cuvid", decoder_option={"resize": f"{width}x{height}"}, hw_accel="cuda:0")
    s.seek(seek)
    s.fill_buffer()
    (chunk,) = s.pop_chunks()
    return chunk.cpu()
現在我們執行它們並將結果影格視覺化。
params = {"height": 224, "width": 224, "seek": 3}

frames = [
    decode_resize_ffmpeg(None, **params),
    decode_resize_ffmpeg("neighbor", **params),
    decode_resize_ffmpeg("bilinear", **params),
    decode_resize_ffmpeg("bicubic", **params),
    decode_resize_cuvid(**params),
    decode_resize_ffmpeg("spline", **params),
    decode_resize_ffmpeg("lanczos:param0=1", **params),
    decode_resize_ffmpeg("lanczos:param0=3", **params),
    decode_resize_ffmpeg("lanczos:param0=5", **params),
]
def plot():
    fig, axes = plt.subplots(3, 3, figsize=[12.8, 15.2])
    for i, f in enumerate(frames):
        h, w = f.shape[2:4]
        f = f[..., : h // 4, : w // 4]
        axes[i // 3][i % 3].imshow(yuv_to_rgb(f[0]))
    axes[0][0].set_title("Original")
    axes[0][1].set_title("nearest neighbor")
    axes[0][2].set_title("bilinear")
    axes[1][0].set_title("bicubic")
    axes[1][1].set_title("NVDEC")
    axes[1][2].set_title("spline")
    axes[2][0].set_title("lanczos(1)")
    axes[2][1].set_title("lanczos(3)")
    axes[2][2].set_title("lanczos(5)")

    plt.setp(axes, xticks=[], yticks=[])
    plt.tight_layout()


plot()
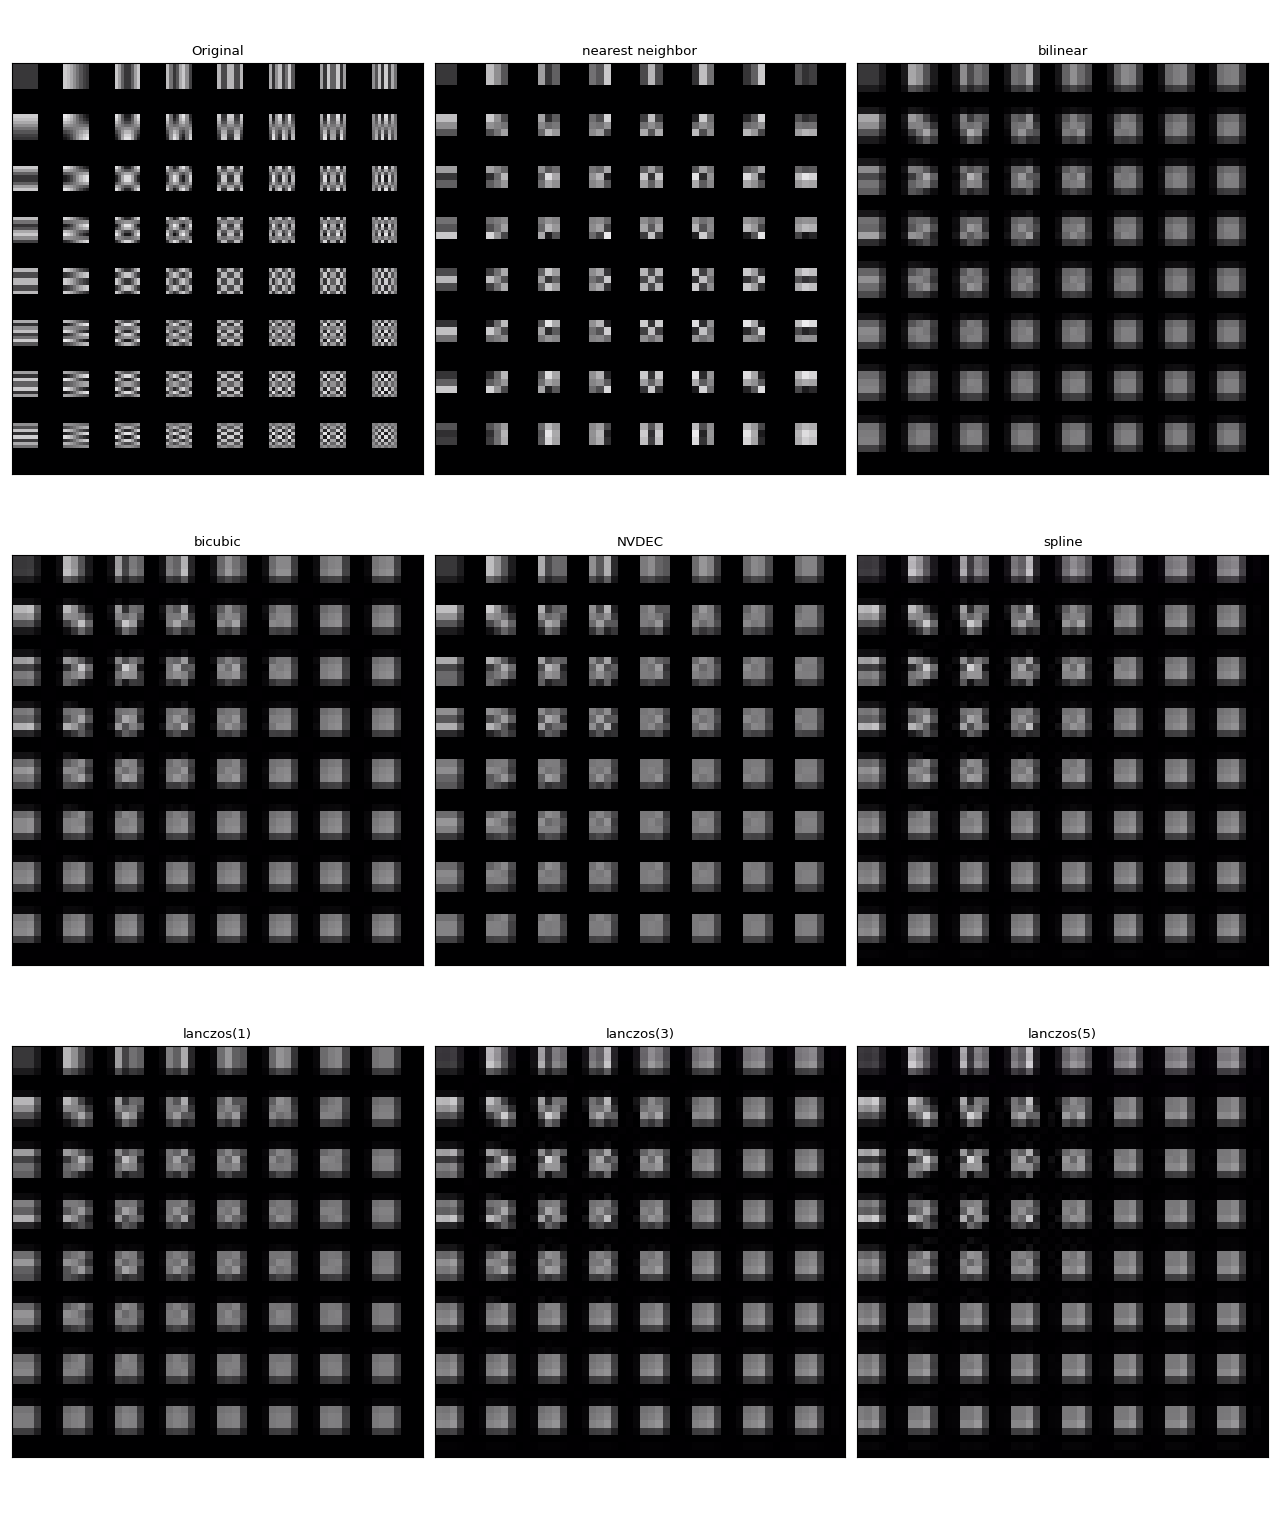
它們沒有一個完全相同。在作者看來,lanczos(1) 似乎與 NVDEC 最相似。bicubic 看起來也很接近。
使用 StreamReader 基準測試 NVDEC
在本節中,我們比較軟體影片解碼和硬體影片解碼的效能。
解碼為 CUDA 影格
首先,我們比較軟體解碼器和硬體編碼器解碼相同影片所需的時間。為了使結果具有可比性,當使用軟體解碼器時,我們會將結果張量移動到 CUDA。
測試程序如下
使用硬體解碼器並直接將資料放置在 CUDA 上
使用軟體解碼器,產生 CPU 張量並將其移動到 CUDA。
以下函數實作了硬體解碼器測試案例。
def test_decode_cuda(src, decoder, hw_accel="cuda", frames_per_chunk=5):
    s = StreamReader(src)
    s.add_video_stream(frames_per_chunk, decoder=decoder, hw_accel=hw_accel)

    num_frames = 0
    chunk = None
    t0 = time.monotonic()
    for (chunk,) in s.stream():
        num_frames += chunk.shape[0]
    elapsed = time.monotonic() - t0
    print(f" - Shape: {chunk.shape}")
    fps = num_frames / elapsed
    print(f" - Processed {num_frames} frames in {elapsed:.2f} seconds. ({fps:.2f} fps)")
    return fps
以下函數實作了軟體解碼器測試案例。
def test_decode_cpu(src, threads, decoder=None, frames_per_chunk=5):
    s = StreamReader(src)
    s.add_video_stream(frames_per_chunk, decoder=decoder, decoder_option={"threads": f"{threads}"})

    num_frames = 0
    device = torch.device("cuda")
    t0 = time.monotonic()
    for i, (chunk,) in enumerate(s.stream()):
        if i == 0:
            print(f" - Shape: {chunk.shape}")
        num_frames += chunk.shape[0]
        chunk = chunk.to(device)
    elapsed = time.monotonic() - t0
    fps = num_frames / elapsed
    print(f" - Processed {num_frames} frames in {elapsed:.2f} seconds. ({fps:.2f} fps)")
    return fps
對於每個影片解析度,我們執行具有不同執行緒數量的多個軟體解碼器測試案例。
def run_decode_tests(src, frames_per_chunk=5):
    fps = []
    print(f"Testing: {os.path.basename(src)}")
    for threads in [1, 4, 8, 16]:
        print(f"* Software decoding (num_threads={threads})")
        fps.append(test_decode_cpu(src, threads))
    print("* Hardware decoding")
    fps.append(test_decode_cuda(src, decoder="h264_cuvid"))
    return fps
現在我們使用不同解析度的影片執行測試。
QVGA
  0%|          | 0.00/1.06M [00:00<?, ?B/s]
100%|##########| 1.06M/1.06M [00:00<00:00, 147MB/s]
Testing: testsrc2_qvga.h264.mp4
* Software decoding (num_threads=1)
 - Shape: torch.Size([5, 3, 240, 320])
 - Processed 900 frames in 0.50 seconds. (1814.82 fps)
* Software decoding (num_threads=4)
 - Shape: torch.Size([5, 3, 240, 320])
 - Processed 900 frames in 0.34 seconds. (2679.88 fps)
* Software decoding (num_threads=8)
 - Shape: torch.Size([5, 3, 240, 320])
 - Processed 900 frames in 0.34 seconds. (2674.27 fps)
* Software decoding (num_threads=16)
 - Shape: torch.Size([5, 3, 240, 320])
 - Processed 895 frames in 0.43 seconds. (2088.70 fps)
* Hardware decoding
 - Shape: torch.Size([5, 3, 240, 320])
 - Processed 900 frames in 2.01 seconds. (447.36 fps)
VGA
  0%|          | 0.00/3.59M [00:00<?, ?B/s]
 59%|#####9    | 2.12M/3.59M [00:00<00:00, 10.0MB/s]
100%|##########| 3.59M/3.59M [00:00<00:00, 16.3MB/s]
Testing: testsrc2_vga.h264.mp4
* Software decoding (num_threads=1)
 - Shape: torch.Size([5, 3, 480, 640])
 - Processed 900 frames in 1.20 seconds. (749.76 fps)
* Software decoding (num_threads=4)
 - Shape: torch.Size([5, 3, 480, 640])
 - Processed 900 frames in 0.71 seconds. (1274.24 fps)
* Software decoding (num_threads=8)
 - Shape: torch.Size([5, 3, 480, 640])
 - Processed 900 frames in 0.70 seconds. (1285.18 fps)
* Software decoding (num_threads=16)
 - Shape: torch.Size([5, 3, 480, 640])
 - Processed 895 frames in 0.64 seconds. (1402.77 fps)
* Hardware decoding
 - Shape: torch.Size([5, 3, 480, 640])
 - Processed 900 frames in 0.34 seconds. (2639.80 fps)
XGA
  0%|          | 0.00/9.22M [00:00<?, ?B/s]
 98%|#########7| 9.00M/9.22M [00:00<00:00, 35.8MB/s]
100%|##########| 9.22M/9.22M [00:00<00:00, 36.4MB/s]
Testing: testsrc2_xga.h264.mp4
* Software decoding (num_threads=1)
 - Shape: torch.Size([5, 3, 768, 1024])
 - Processed 900 frames in 2.70 seconds. (333.73 fps)
* Software decoding (num_threads=4)
 - Shape: torch.Size([5, 3, 768, 1024])
 - Processed 900 frames in 1.38 seconds. (652.84 fps)
* Software decoding (num_threads=8)
 - Shape: torch.Size([5, 3, 768, 1024])
 - Processed 900 frames in 1.28 seconds. (703.55 fps)
* Software decoding (num_threads=16)
 - Shape: torch.Size([5, 3, 768, 1024])
 - Processed 895 frames in 1.30 seconds. (690.26 fps)
* Hardware decoding
 - Shape: torch.Size([5, 3, 768, 1024])
 - Processed 900 frames in 0.61 seconds. (1473.92 fps)
結果
現在我們繪製結果。
def plot():
    fig, ax = plt.subplots(figsize=[9.6, 6.4])

    for items in zip(fps_qvga, fps_vga, fps_xga, "ov^sx"):
        ax.plot(items[:-1], marker=items[-1])
    ax.grid(axis="both")
    ax.set_xticks([0, 1, 2], ["QVGA (320x240)", "VGA (640x480)", "XGA (1024x768)"])
    ax.legend(
        [
            "Software Decoding (threads=1)",
            "Software Decoding (threads=4)",
            "Software Decoding (threads=8)",
            "Software Decoding (threads=16)",
            "Hardware Decoding (CUDA Tensor)",
        ]
    )
    ax.set_title("Speed of processing video frames")
    ax.set_ylabel("Frames per second")
    plt.tight_layout()


plot()
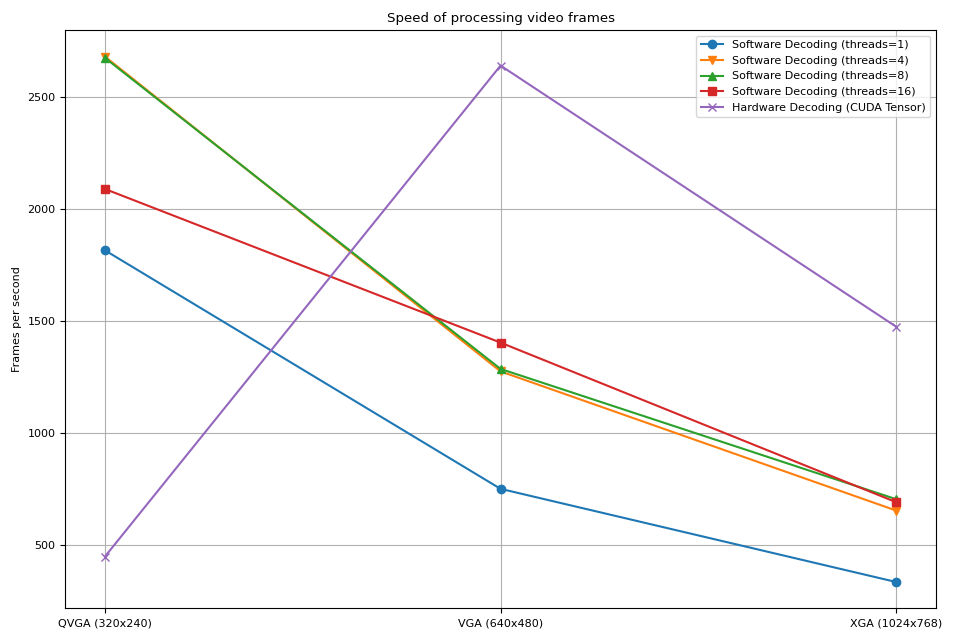
我們觀察到以下幾點
增加軟體解碼中的執行緒數量可以加快流程,但效能在 8 個執行緒左右達到飽和。
使用硬體解碼器獲得的效能提升取決於影片的解析度。
在較低解析度(如 QVGA)下,硬體解碼比軟體解碼慢
在較高解析度(如 XGA)下,硬體解碼比軟體解碼快。
值得注意的是,效能提升也取決於 GPU 的類型。我們觀察到,在使用 V100 或 A100 GPU 解碼 VGA 影片時,硬體解碼器比軟體解碼器慢。但使用 A10 GPU 硬體解碼器比軟體解碼器快。
解碼和調整大小
接下來,我們將調整大小的操作添加到流程中。我們將比較以下流程。
使用軟體解碼器解碼影片,並將影格讀取為 PyTorch 張量。使用
torch.nn.functional.interpolate()調整張量大小,然後將結果張量發送到 CUDA 裝置。使用軟體解碼器解碼影片,使用 FFmpeg 的濾鏡圖調整影格大小,將調整大小後的影格讀取為 PyTorch 張量,然後將其發送到 CUDA 裝置。
使用硬體解碼器同時解碼和調整影片大小,將結果影格讀取為 CUDA 張量。
流程 1 代表常見的影片載入實作。
流程 2 使用 FFmpeg 的濾鏡圖,允許在將原始影格轉換為張量之前對其進行操作。
流程 3 具有從 CPU 到 CUDA 的最小資料傳輸量,這對高效能資料載入有顯著貢獻。
以下函數實作了流程 1。它使用 PyTorch 的 torch.nn.functional.interpolate()。我們使用 bincubic 模式,因為我們看到結果影格最接近 NVDEC 調整大小。
def test_decode_then_resize(src, height, width, mode="bicubic", frames_per_chunk=5):
    s = StreamReader(src)
    s.add_video_stream(frames_per_chunk, decoder_option={"threads": "8"})

    num_frames = 0
    device = torch.device("cuda")
    chunk = None
    t0 = time.monotonic()
    for (chunk,) in s.stream():
        num_frames += chunk.shape[0]
        chunk = torch.nn.functional.interpolate(chunk, [height, width], mode=mode, antialias=True)
        chunk = chunk.to(device)
    elapsed = time.monotonic() - t0
    fps = num_frames / elapsed
    print(f" - Shape: {chunk.shape}")
    print(f" - Processed {num_frames} frames in {elapsed:.2f} seconds. ({fps:.2f} fps)")
    return fps
以下函數實作了流程 2。影格在解碼過程中被調整大小,然後發送到 CUDA 裝置。
我們使用 bincubic 模式,以使結果與上述基於 PyTorch 的實作具有可比性。
def test_decode_and_resize(src, height, width, mode="bicubic", frames_per_chunk=5):
    s = StreamReader(src)
    s.add_video_stream(
        frames_per_chunk, filter_desc=f"scale={width}:{height}:sws_flags={mode}", decoder_option={"threads": "8"}
    )

    num_frames = 0
    device = torch.device("cuda")
    chunk = None
    t0 = time.monotonic()
    for (chunk,) in s.stream():
        num_frames += chunk.shape[0]
        chunk = chunk.to(device)
    elapsed = time.monotonic() - t0
    fps = num_frames / elapsed
    print(f" - Shape: {chunk.shape}")
    print(f" - Processed {num_frames} frames in {elapsed:.2f} seconds. ({fps:.2f} fps)")
    return fps
以下函數實作了流程 3。調整大小由 NVDEC 執行,並且結果張量放置在 CUDA 記憶體中。
def test_hw_decode_and_resize(src, decoder, decoder_option, hw_accel="cuda", frames_per_chunk=5):
    s = StreamReader(src)
    s.add_video_stream(5, decoder=decoder, decoder_option=decoder_option, hw_accel=hw_accel)

    num_frames = 0
    chunk = None
    t0 = time.monotonic()
    for (chunk,) in s.stream():
        num_frames += chunk.shape[0]
    elapsed = time.monotonic() - t0
    fps = num_frames / elapsed
    print(f" - Shape: {chunk.shape}")
    print(f" - Processed {num_frames} frames in {elapsed:.2f} seconds. ({fps:.2f} fps)")
    return fps
以下函數在給定的來源上執行基準測試函數。
def run_resize_tests(src):
    print(f"Testing: {os.path.basename(src)}")
    height, width = 224, 224
    print("* Software decoding with PyTorch interpolate")
    cpu_resize1 = test_decode_then_resize(src, height=height, width=width)
    print("* Software decoding with FFmpeg scale")
    cpu_resize2 = test_decode_and_resize(src, height=height, width=width)
    print("* Hardware decoding with resize")
    cuda_resize = test_hw_decode_and_resize(src, decoder="h264_cuvid", decoder_option={"resize": f"{width}x{height}"})
    return [cpu_resize1, cpu_resize2, cuda_resize]
現在我們執行測試。
QVGA
Testing: testsrc2_qvga.h264.mp4
* Software decoding with PyTorch interpolate
 - Shape: torch.Size([5, 3, 224, 224])
 - Processed 900 frames in 0.61 seconds. (1486.29 fps)
* Software decoding with FFmpeg scale
 - Shape: torch.Size([5, 3, 224, 224])
 - Processed 900 frames in 0.40 seconds. (2229.01 fps)
* Hardware decoding with resize
 - Shape: torch.Size([5, 3, 224, 224])
 - Processed 900 frames in 2.02 seconds. (444.56 fps)
VGA
Testing: testsrc2_vga.h264.mp4
* Software decoding with PyTorch interpolate
 - Shape: torch.Size([5, 3, 224, 224])
 - Processed 900 frames in 1.45 seconds. (620.26 fps)
* Software decoding with FFmpeg scale
 - Shape: torch.Size([5, 3, 224, 224])
 - Processed 900 frames in 0.69 seconds. (1300.24 fps)
* Hardware decoding with resize
 - Shape: torch.Size([5, 3, 224, 224])
 - Processed 900 frames in 0.34 seconds. (2653.73 fps)
XGA
Testing: testsrc2_xga.h264.mp4
* Software decoding with PyTorch interpolate
 - Shape: torch.Size([5, 3, 224, 224])
 - Processed 900 frames in 2.69 seconds. (334.90 fps)
* Software decoding with FFmpeg scale
 - Shape: torch.Size([5, 3, 224, 224])
 - Processed 900 frames in 1.06 seconds. (850.30 fps)
* Hardware decoding with resize
 - Shape: torch.Size([5, 3, 224, 224])
 - Processed 900 frames in 0.61 seconds. (1476.55 fps)
結果
現在我們繪製結果。
def plot():
    fig, ax = plt.subplots(figsize=[9.6, 6.4])

    for items in zip(fps_qvga, fps_vga, fps_xga, "ov^sx"):
        ax.plot(items[:-1], marker=items[-1])
    ax.grid(axis="both")
    ax.set_xticks([0, 1, 2], ["QVGA (320x240)", "VGA (640x480)", "XGA (1024x768)"])
    ax.legend(
        [
            "Software decoding\nwith resize\n(PyTorch interpolate)",
            "Software decoding\nwith resize\n(FFmpeg scale)",
            "NVDEC\nwith resizing",
        ]
    )
    ax.set_title("Speed of processing video frames")
    ax.set_xlabel("Input video resolution")
    ax.set_ylabel("Frames per second")
    plt.tight_layout()


plot()
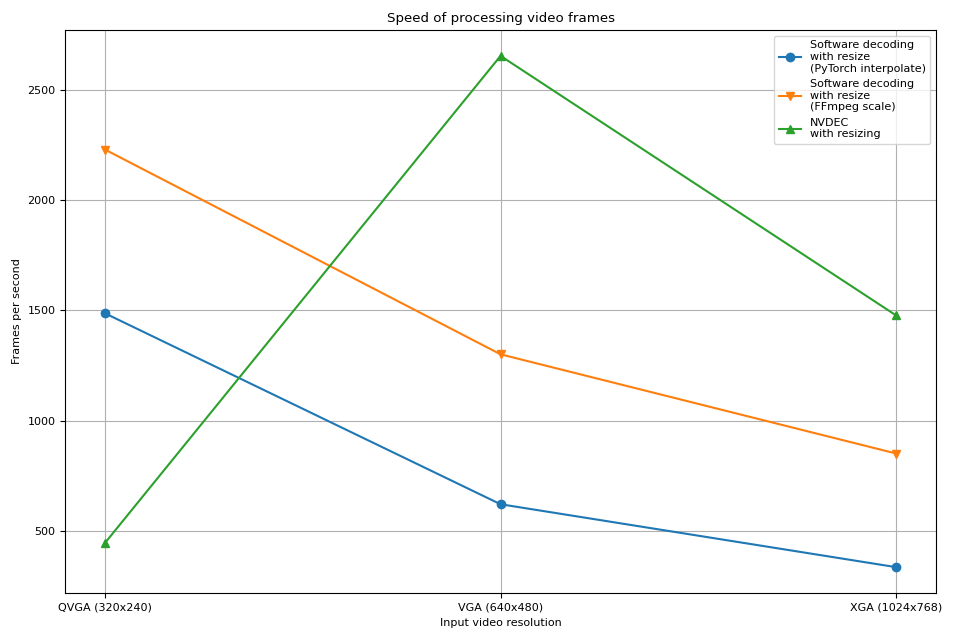
硬體解碼器顯示出與先前實驗相似的趨勢。事實上,效能幾乎相同。硬體調整大小對於縮小影格幾乎沒有額外的開銷。
軟體解碼也顯示出相似的趨勢。在解碼過程中執行調整大小會更快。一種可能的解釋是,影片影格在內部儲存為 YUV420P,與 RGB24 或 YUV444P 相比,其像素數量減半。這意味著,如果在將影格資料複製到 PyTorch 張量之前調整大小,則操作和複製的像素數量小於在將影格轉換為張量後應用調整大小的情況。
腳本的總執行時間:( 0 分鐘 31.872 秒)
