


注意
按一下這裡以下載完整的範例程式碼
使用 NVENC 加速影片編碼
作者: Moto Hira
本教學展示如何使用 NVIDIA 的硬體影片編碼器 (NVENC) 與 TorchAudio,以及它如何改善影片編碼的效能。
注意
大多數現代 GPU 都有 HW 解碼器和編碼器,但某些高階 GPU,如 A100 和 H100,沒有 HW 編碼器。請參考以下連結以了解可用性和格式支援。https://developer.nvidia.com/video-encode-and-decode-gpu-support-matrix-new
嘗試在這些 GPU 上使用 HW 編碼器會失敗,並顯示類似 Generic error in an external library 的錯誤訊息。您可以使用 torchaudio.utils.ffmpeg_utils.set_log_level() 啟用偵錯日誌,以查看沿途發出的更詳細的錯誤訊息。
import torch
import torchaudio

print(torch.__version__)
print(torchaudio.__version__)

import io
import time

import matplotlib.pyplot as plt
from IPython.display import Video
from torchaudio.io import StreamReader, StreamWriter
2.6.0
2.6.0
檢查先決條件
首先,我們檢查 TorchAudio 是否正確偵測到支援 HW 解碼器/編碼器的 FFmpeg 函式庫。
from torchaudio.utils import ffmpeg_utils
FFmpeg Library versions:
  libavcodec:   60.3.100
  libavdevice:  60.1.100
  libavfilter:  9.3.100
  libavformat:  60.3.100
  libavutil:    58.2.100
Available NVENC Encoders:
 - av1_nvenc
 - h264_nvenc
 - hevc_nvenc
print("Avaialbe GPU:")
print(torch.cuda.get_device_properties(0))
Avaialbe GPU:
_CudaDeviceProperties(name='NVIDIA A10G', major=8, minor=6, total_memory=22502MB, multi_processor_count=80, uuid=3a6a8555-efc9-d0dc-972b-36624af6fad8, L2_cache_size=6MB)
我們使用以下輔助函數來產生測試影格資料。有關合成影片產生的詳細資訊,請參考StreamReader 進階用法。
def get_data(height, width, format="yuv444p", frame_rate=30000 / 1001, duration=4):
    src = f"testsrc2=rate={frame_rate}:size={width}x{height}:duration={duration}"
    s = StreamReader(src=src, format="lavfi")
    s.add_basic_video_stream(-1, format=format)
    s.process_all_packets()
    (video,) = s.pop_chunks()
    return video
使用 NVENC 編碼影片
若要使用 HW 影片編碼器,您需要在定義輸出影片串流時指定 HW 編碼器,方法是將 encoder 選項提供給 add_video_stream()。
pict_config = {
    "height": 360,
    "width": 640,
    "frame_rate": 30000 / 1001,
    "format": "yuv444p",
}

frame_data = get_data(**pict_config)
w = StreamWriter(io.BytesIO(), format="mp4")
w.add_video_stream(**pict_config, encoder="h264_nvenc", encoder_format="yuv444p")
with w.open():
    w.write_video_chunk(0, frame_data)
與 HW 解碼器類似,預設情況下,編碼器期望影格資料位於 CPU 記憶體中。 若要從 CUDA 記憶體傳送資料,您需要指定 hw_accel 選項。
buffer = io.BytesIO()
w = StreamWriter(buffer, format="mp4")
w.add_video_stream(**pict_config, encoder="h264_nvenc", encoder_format="yuv444p", hw_accel="cuda:0")
with w.open():
    w.write_video_chunk(0, frame_data.to(torch.device("cuda:0")))
buffer.seek(0)
video_cuda = buffer.read()
Video(video_cuda, embed=True, mimetype="video/mp4")
使用 StreamWriter 測試 NVENC 效能
現在我們比較軟體編碼器和硬體編碼器的效能。
與 NVDEC 中的基準測試類似,我們處理不同解析度的影片,並測量編碼所需的時間。
我們還測量產生的影片檔案大小。
以下函數會編碼給定的影格,並測量編碼所需的時間以及產生的影片資料大小。
def test_encode(data, encoder, width, height, hw_accel=None, **config):
    assert data.is_cuda

    buffer = io.BytesIO()
    s = StreamWriter(buffer, format="mp4")
    s.add_video_stream(encoder=encoder, width=width, height=height, hw_accel=hw_accel, **config)
    with s.open():
        t0 = time.monotonic()
        if hw_accel is None:
            data = data.to("cpu")
        s.write_video_chunk(0, data)
        elapsed = time.monotonic() - t0
    size = buffer.tell()
    fps = len(data) / elapsed
    print(f" - Processed {len(data)} frames in {elapsed:.2f} seconds. ({fps:.2f} fps)")
    print(f" - Encoded data size: {size} bytes")
    return elapsed, size
我們針對以下配置進行測試
具有 1、4、8 個執行緒的軟體編碼器
具有和不具有
hw_accel選項的硬體編碼器。
def run_tests(height, width, duration=4):
    # Generate the test data
    print(f"Testing resolution: {width}x{height}")
    pict_config = {
        "height": height,
        "width": width,
        "frame_rate": 30000 / 1001,
        "format": "yuv444p",
    }

    data = get_data(**pict_config, duration=duration)
    data = data.to(torch.device("cuda:0"))

    times = []
    sizes = []

    # Test software encoding
    encoder_config = {
        "encoder": "libx264",
        "encoder_format": "yuv444p",
    }
    for i, num_threads in enumerate([1, 4, 8]):
        print(f"* Software Encoder (num_threads={num_threads})")
        time_, size = test_encode(
            data,
            encoder_option={"threads": str(num_threads)},
            **pict_config,
            **encoder_config,
        )
        times.append(time_)
        if i == 0:
            sizes.append(size)

    # Test hardware encoding
    encoder_config = {
        "encoder": "h264_nvenc",
        "encoder_format": "yuv444p",
        "encoder_option": {"gpu": "0"},
    }
    for i, hw_accel in enumerate([None, "cuda"]):
        print(f"* Hardware Encoder {'(CUDA frames)' if hw_accel else ''}")
        time_, size = test_encode(
            data,
            **pict_config,
            **encoder_config,
            hw_accel=hw_accel,
        )
        times.append(time_)
        if i == 0:
            sizes.append(size)
    return times, sizes
我們變更影片的解析度,以查看這些測量結果如何變化。
360P
Testing resolution: 640x360
* Software Encoder (num_threads=1)
 - Processed 120 frames in 0.63 seconds. (189.14 fps)
 - Encoded data size: 381331 bytes
* Software Encoder (num_threads=4)
 - Processed 120 frames in 0.26 seconds. (468.75 fps)
 - Encoded data size: 381307 bytes
* Software Encoder (num_threads=8)
 - Processed 120 frames in 0.18 seconds. (655.05 fps)
 - Encoded data size: 390689 bytes
* Hardware Encoder
 - Processed 120 frames in 0.05 seconds. (2247.39 fps)
 - Encoded data size: 1262979 bytes
* Hardware Encoder (CUDA frames)
 - Processed 120 frames in 0.05 seconds. (2585.26 fps)
 - Encoded data size: 1262979 bytes
720P
Testing resolution: 1280x720
* Software Encoder (num_threads=1)
 - Processed 120 frames in 2.31 seconds. (51.99 fps)
 - Encoded data size: 1335451 bytes
* Software Encoder (num_threads=4)
 - Processed 120 frames in 0.87 seconds. (138.63 fps)
 - Encoded data size: 1336418 bytes
* Software Encoder (num_threads=8)
 - Processed 120 frames in 0.71 seconds. (168.02 fps)
 - Encoded data size: 1344063 bytes
* Hardware Encoder
 - Processed 120 frames in 0.33 seconds. (368.78 fps)
 - Encoded data size: 1358969 bytes
* Hardware Encoder (CUDA frames)
 - Processed 120 frames in 0.15 seconds. (802.30 fps)
 - Encoded data size: 1358969 bytes
1080P
Testing resolution: 1920x1080
* Software Encoder (num_threads=1)
 - Processed 120 frames in 4.78 seconds. (25.12 fps)
 - Encoded data size: 2678241 bytes
* Software Encoder (num_threads=4)
 - Processed 120 frames in 1.85 seconds. (64.90 fps)
 - Encoded data size: 2682028 bytes
* Software Encoder (num_threads=8)
 - Processed 120 frames in 1.57 seconds. (76.39 fps)
 - Encoded data size: 2685086 bytes
* Hardware Encoder
 - Processed 120 frames in 0.72 seconds. (166.70 fps)
 - Encoded data size: 1705900 bytes
* Hardware Encoder (CUDA frames)
 - Processed 120 frames in 0.32 seconds. (371.06 fps)
 - Encoded data size: 1705900 bytes
現在我們繪製結果。
def plot():
    fig, axes = plt.subplots(2, 1, sharex=True, figsize=[9.6, 7.2])

    for items in zip(time_360, time_720, time_1080, "ov^X+"):
        axes[0].plot(items[:-1], marker=items[-1])
    axes[0].grid(axis="both")
    axes[0].set_xticks([0, 1, 2], ["360p", "720p", "1080p"], visible=True)
    axes[0].tick_params(labeltop=False)
    axes[0].legend(
        [
            "Software Encoding (threads=1)",
            "Software Encoding (threads=4)",
            "Software Encoding (threads=8)",
            "Hardware Encoding (CPU Tensor)",
            "Hardware Encoding (CUDA Tensor)",
        ]
    )
    axes[0].set_title("Time to encode videos with different resolutions")
    axes[0].set_ylabel("Time [s]")

    for items in zip(size_360, size_720, size_1080, "v^"):
        axes[1].plot(items[:-1], marker=items[-1])
    axes[1].grid(axis="both")
    axes[1].set_xticks([0, 1, 2], ["360p", "720p", "1080p"])
    axes[1].set_ylabel("The encoded size [bytes]")
    axes[1].set_title("The size of encoded videos")
    axes[1].legend(
        [
            "Software Encoding",
            "Hardware Encoding",
        ]
    )

    plt.tight_layout()


plot()
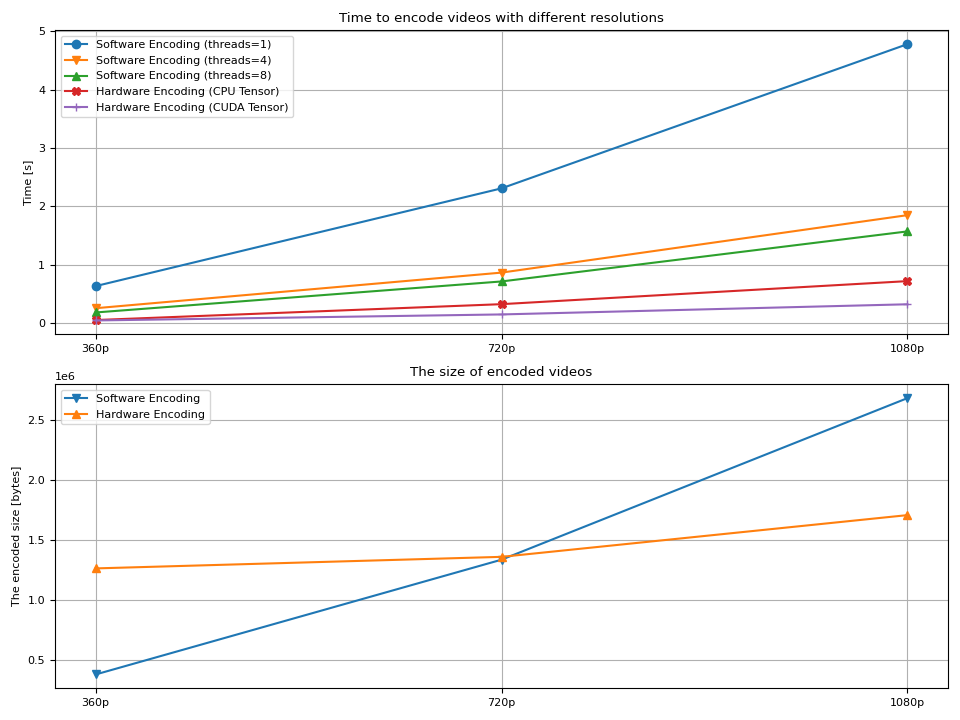
結果
我們觀察到幾件事:
編碼影片的時間隨著解析度變大而增加。
在軟體編碼的情況下,增加執行緒數有助於減少解碼時間。
從額外執行緒獲得的增益在 8 個左右時會減少。
通常,硬體編碼比軟體編碼更快。
使用
hw_accel本身並不能顯著提高編碼速度。產生的影片大小隨著解析度變大而增加。
硬體編碼器在較大解析度下產生較小的影片檔案。
最後一點對作者來說有點奇怪(作者不是影片製作方面的專家)。 通常認為,與軟體編碼器相比,硬體解碼器產生更大的影片。 有人說,軟體編碼器可以對編碼配置進行細粒度控制,因此產生的影片更加最佳化。 同時,硬體編碼器針對效能進行了最佳化,因此無法提供對品質和二進位大小的那麼多控制。
品質抽查
那麼,使用硬體編碼器產生的影片品質如何? 快速抽查高解析度影片後發現,它們在高解析度下具有更明顯的瑕疵。 這可能可以解釋較小的二進位大小。 (意味著,它沒有分配足夠的位元來產生高品質的輸出。)
以下影像是使用硬體編碼器編碼的影片的原始影格。
360P

720P

1080P

我們可以發現,在較高的解析度下有更多明顯的瑕疵。
或許可以使用 encoder_options 引數來減少這些瑕疵。 我們沒有嘗試過,但是如果您嘗試過並找到了更好的品質設定,請隨時告訴我們。 ;)
標籤: torchaudio.io
指令碼的總執行時間: ( 0 分鐘 23.179 秒)
