後端和委派 (Delegate)
適用對象:供應商、後端委派開發人員,他們有興趣將自己的編譯器和硬體整合到 ExecuTorch 中
後端委派是後端處理和執行 PyTorch 程式的入口點,以利用專用後端和硬體的效能和效率優勢,同時仍為 PyTorch 使用者提供接近 PyTorch 執行階段的體驗。
後端介面:概述
從較高的層面來看,後端的進入點由兩個元件定義:
一個用於表示程式的 IR:Edge Dialect(透過
to_edgeAPI 產生)幾個後端需要實作的介面:
預先編譯 (Ahead-of-Time, AOT)
程式預處理 (例如,預先編譯、轉換、最佳化...)。
執行階段
程式初始化 (例如,執行階段編譯)。
程式執行。
(可選) 程式銷毀 (例如,釋放後端擁有的資源)。
委派的後端實作包含:
一個預先編譯的預處理介面
一個執行階段初始化和執行介面
示意圖如下:
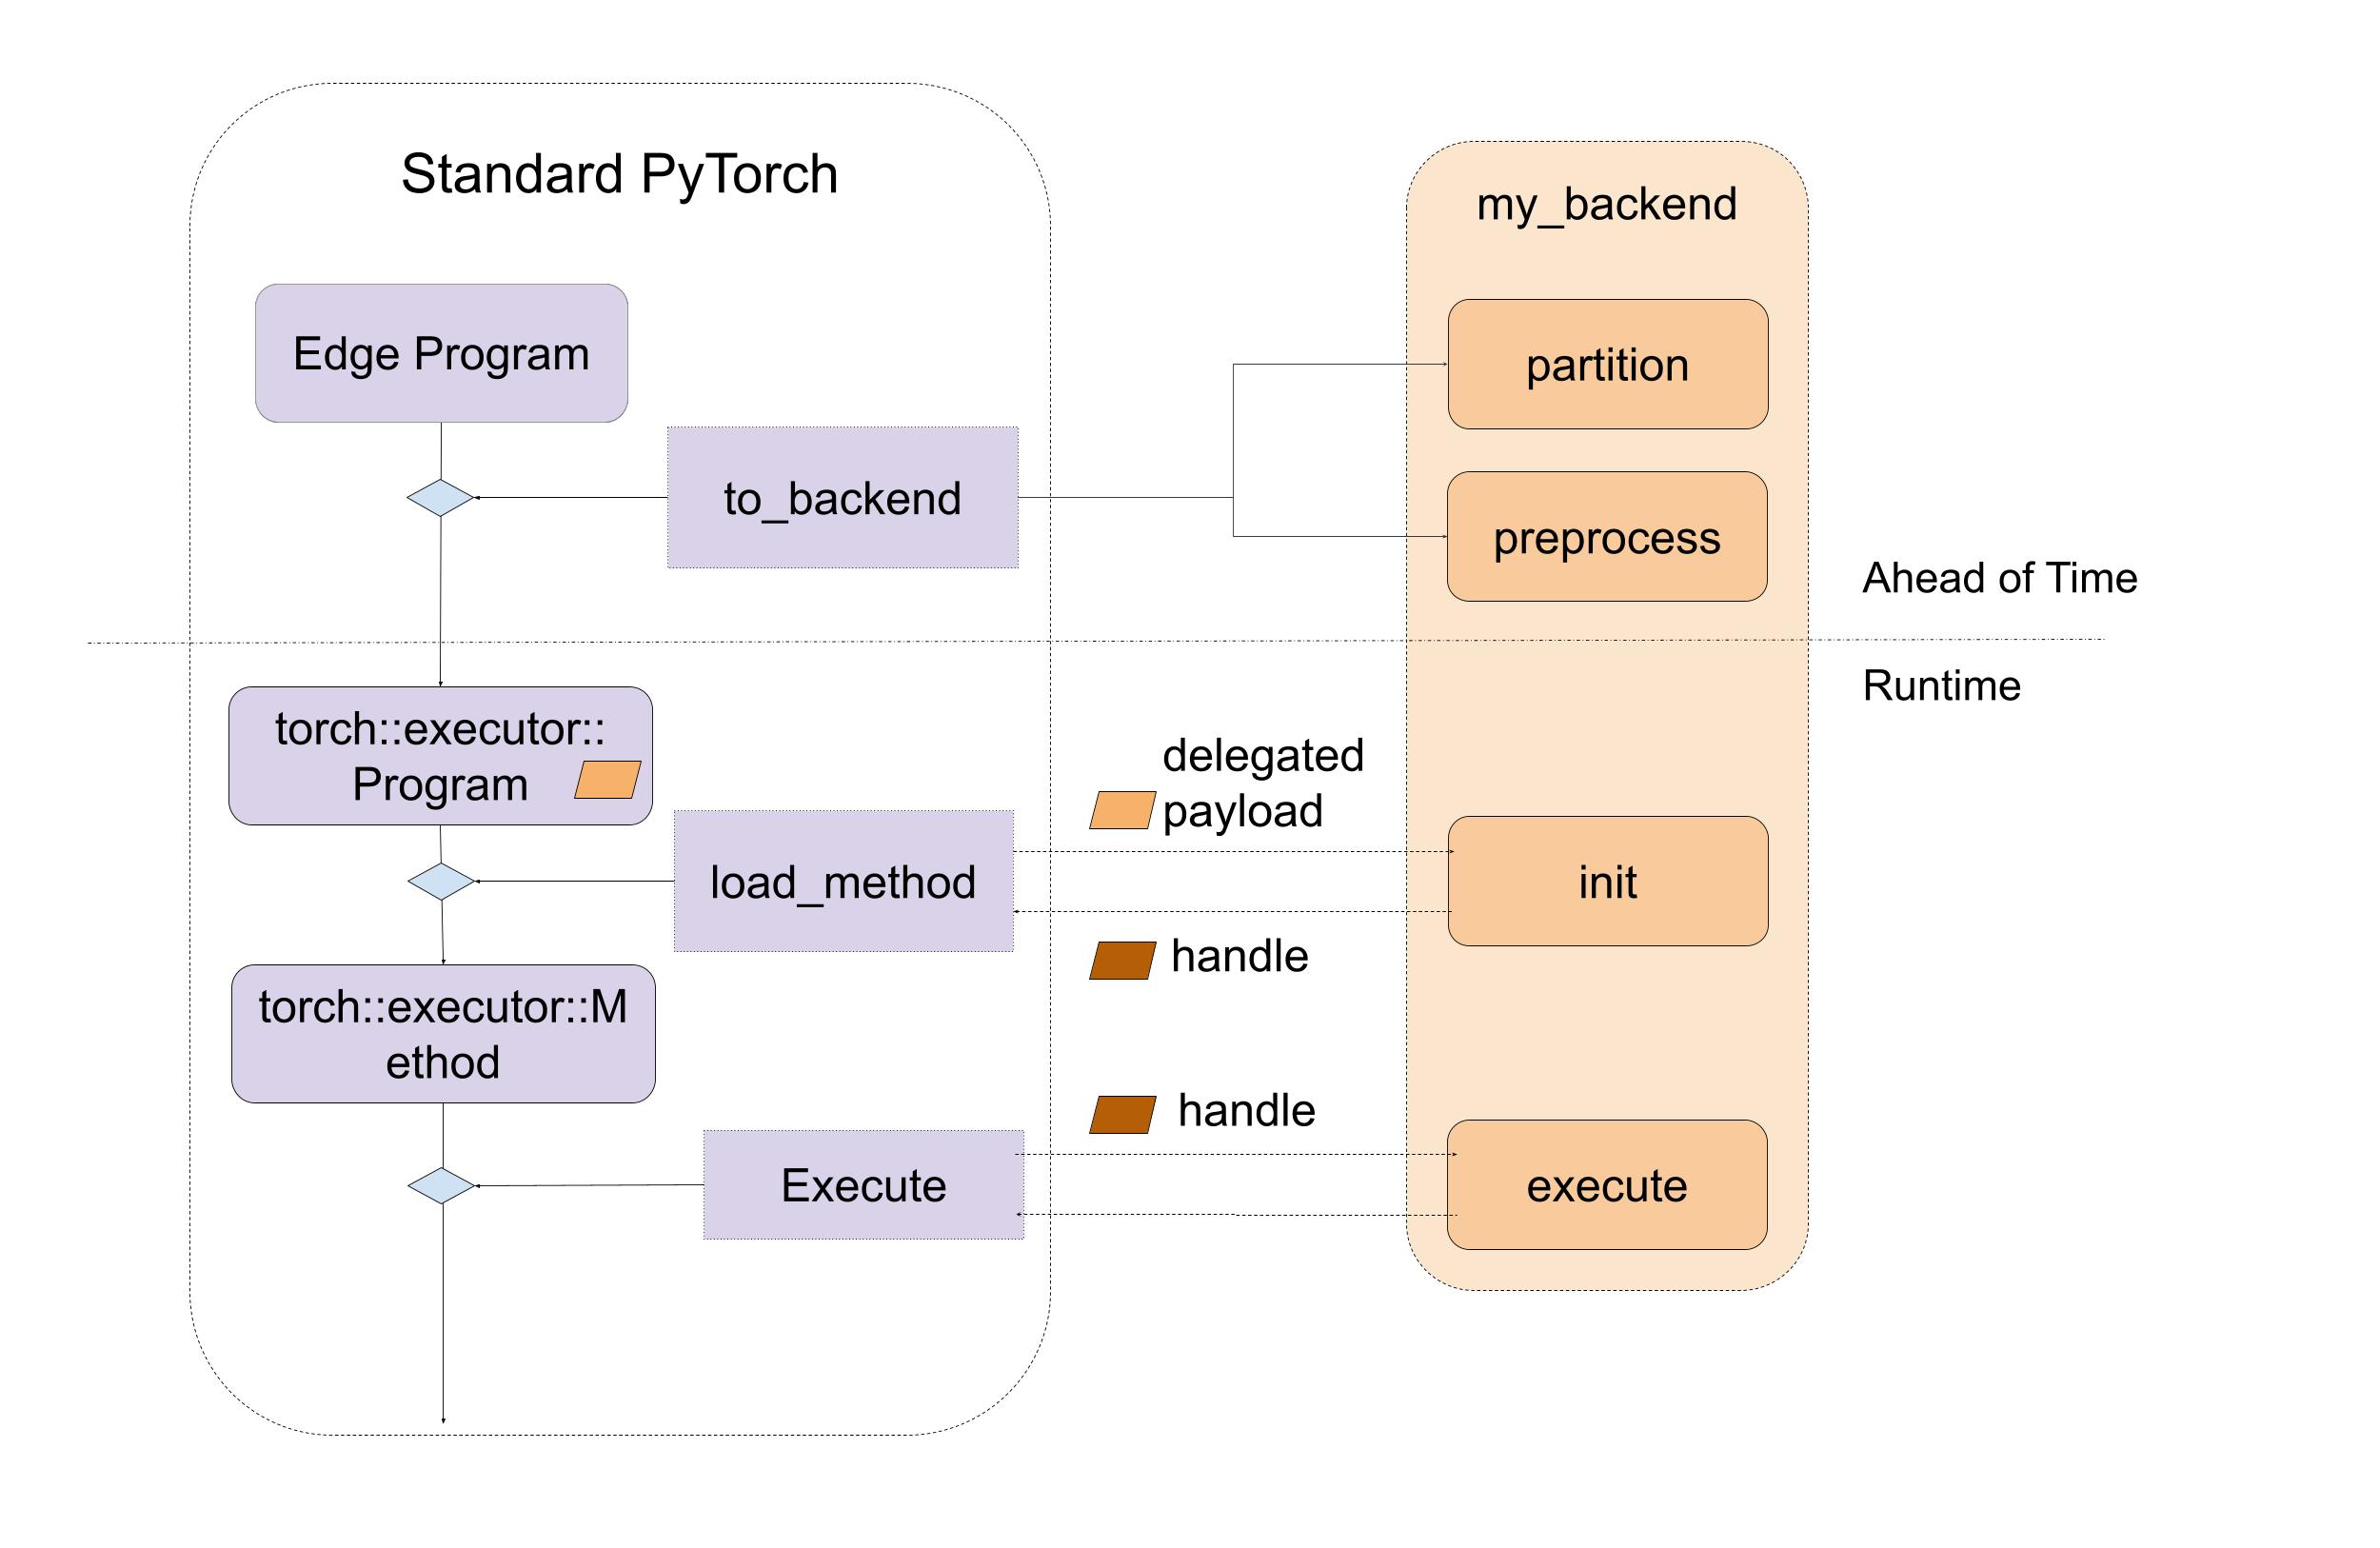
圖 1. 後端介面的進入點高階視圖,包含預先編譯和執行階段。
後端介面:預先編譯預處理
後端主要需要實作兩個預先編譯的進入點:partition 和 preprocess。
partitioner 是後端實作的一種演算法,用於標記要降低到後端的節點。to_backend API 將應用分割演算法,並將每個子圖(由連接的已標記節點組成)降低到目標後端。每個子圖將被發送到後端提供的 preprocess 部分,以編譯為二進位 blob。
在分割期間,exported_program 不允許修改程式,而是應該將標籤應用於每個節點。PartitionResult 包含已標記的匯出程式和分割標籤字典,供 to_backend 查找標籤並連結到 backend_id 和 compile_spec
def partition(
    exported_program: ExportedProgram,
) -> PartitionResult:
在預處理期間,後端會收到一個 edge dialect 程式、一個指定編譯所需值的一組編譯規範,並預期返回一個已編譯的 blob,或包含要在後端執行的所需程式的二進位檔案。在序列化期間,已編譯的 blob 將作為 .pte 檔案的一部分進行序列化,並直接載入到裝置。此過程的 API 為:
def preprocess(
    edge_program: ExportedProgram,
    compile_specs: List[CompileSpec],
) -> PreprocessResult:
此處提供了一個預處理函數的示範:這裡。此示範會循環遍歷 edge_program 的圖形模組中的節點,並將 add、mul 和 sin 指令序列化為字串,該字串稍後將在執行階段進行解析和執行。
示意圖如下:
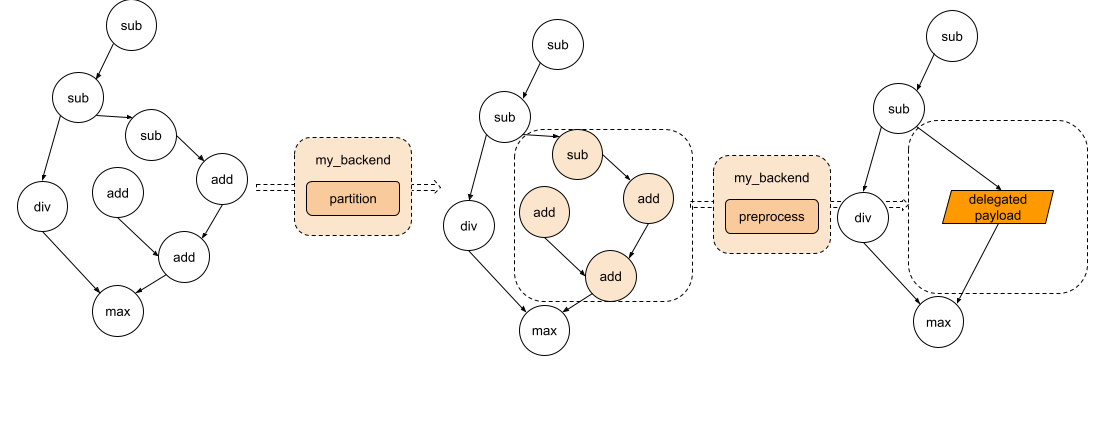
圖 2. 圖形經過分割,每個子圖將被發送到預處理部分。
後端介面:執行階段初始化和執行
在執行階段,preprocess 函數中編譯的 blob 將被載入,並直接傳遞到後端的自訂 init 函數。此函數負責進一步處理已編譯的單元,以及執行任何後端初始化。然後將呼叫後端的自訂 execute 函數來執行 init 產生的控制代碼。最後,如果某些後端需要銷毀,後端可以實作一個 destroy 函數,該函數將在程式超出其生命週期時呼叫。
// Runtime check
ET_NODISCARD bool is_available();

// Runtime initialization
ET_NODISCARD virtual Result<DelegateHandle*> init(
    BackendInitContext& context,
    FreeableBuffer* processed,
    ArrayRef<CompileSpec> compile_specs);

// Runtime execution
ET_NODISCARD virtual Error execute(
    BackendExecutionContext& context,
    DelegateHandle* handle,
    EValue** args);

// [optional] Runtime destroy. Destroy the resource held by the backend
virtual void destroy(ET_UNUSED DelegateHandle* handle);
示意圖如下:
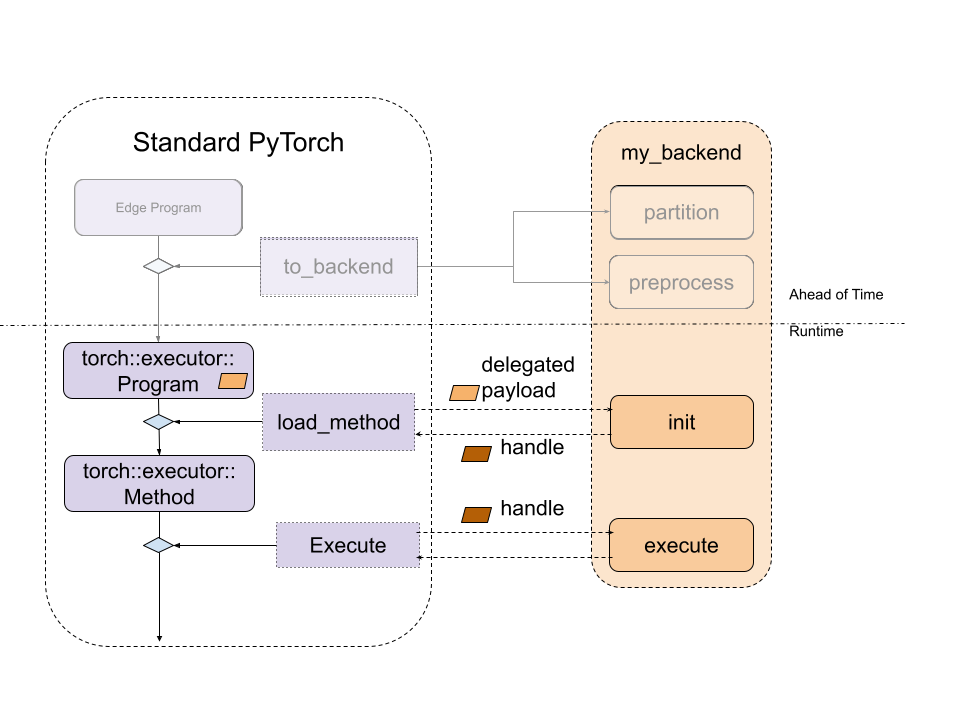
圖 3. 標準 ExecuTorch 執行階段和後端進入點之間的關係。
為了使後端可用於 ExecuTorch 執行階段,必須透過 register_backend API 註冊
ET_NODISCARD Error register_backend(const Backend& backend);
後端的靜態註冊 (即,在程式庫初始化或載入時) 可以按如下方式實現:
namespace {
auto cls = BackendWithCompiler();
Backend backend{"BackendWithCompilerDemo", &cls};
static auto success_with_compiler = register_backend(backend);
} // namespace
開發人員工具整合:可除錯性
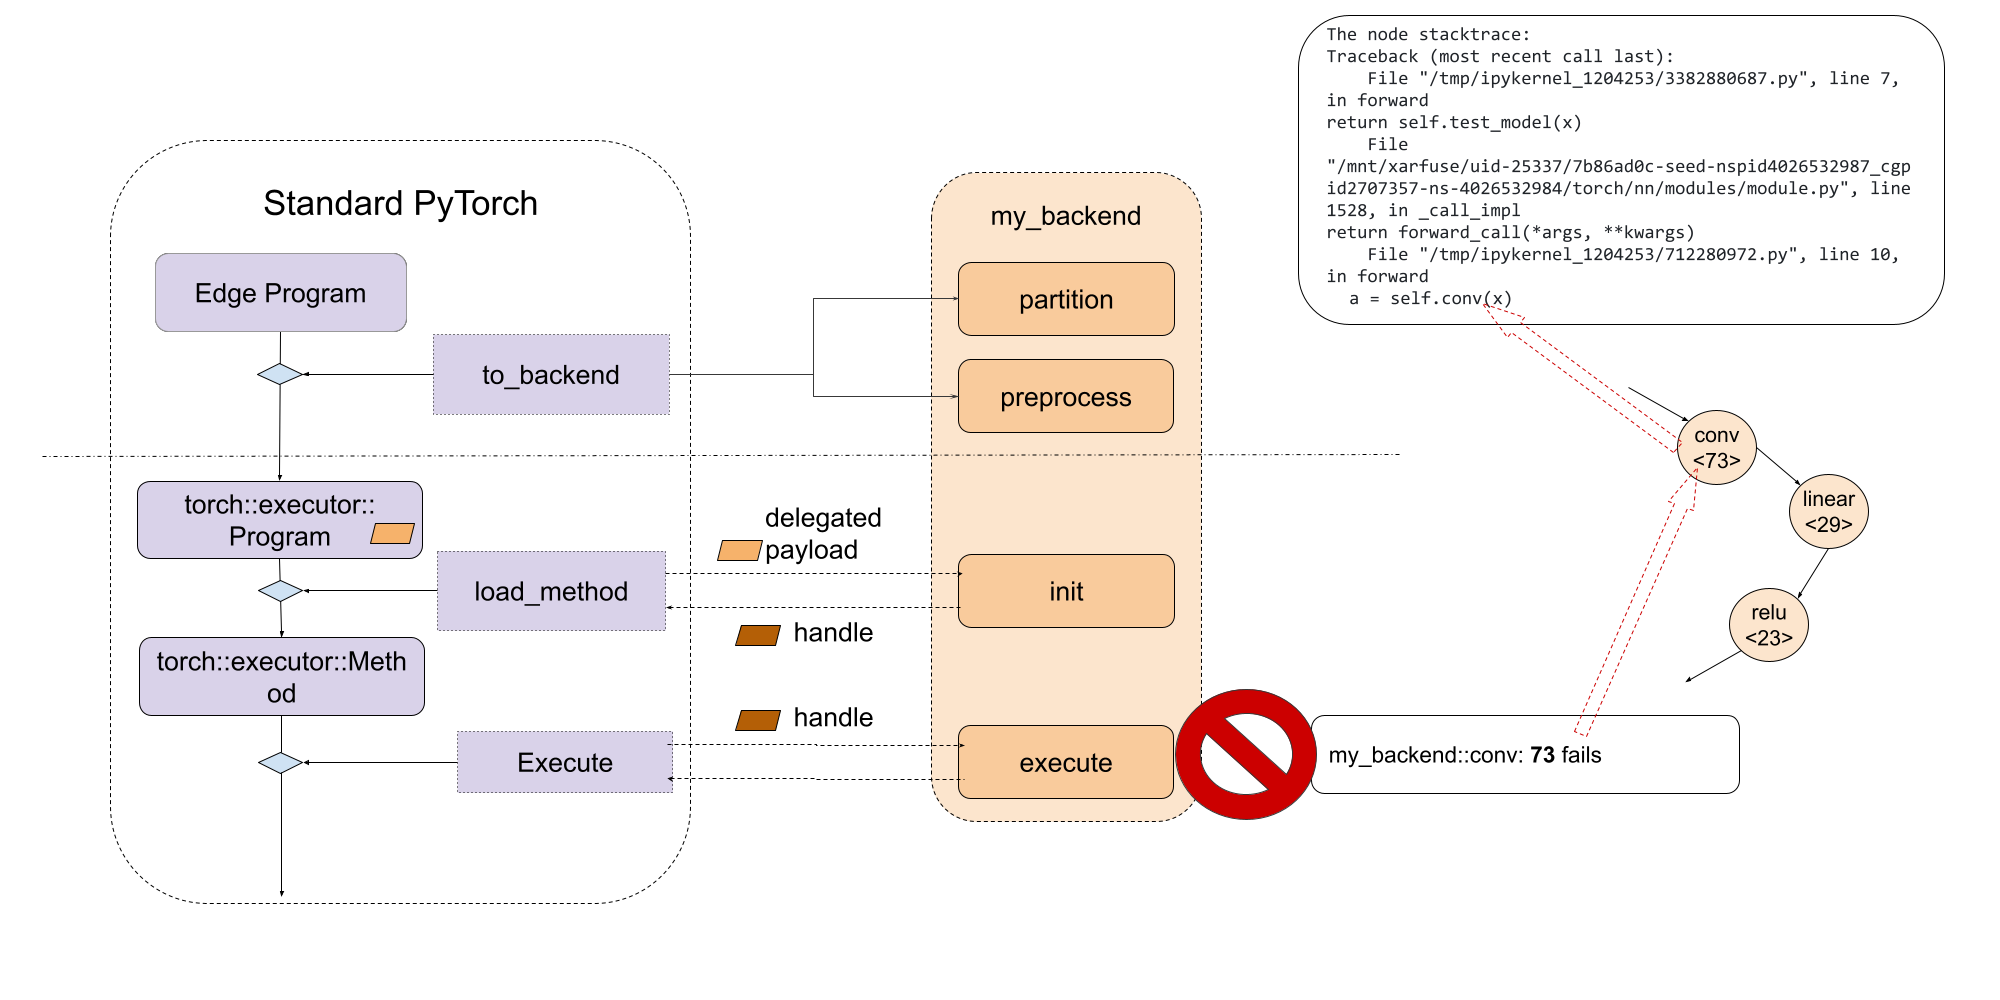
提供一致的除錯體驗(無論是執行階段失敗還是效能分析)非常重要。ExecuTorch 為此採用原生開發人員工具,該工具可以透過除錯控制代碼將程式指令與原始 PyTorch 程式碼關聯起來。您可以在 此處 閱讀更多相關資訊。
委派的程式或子圖對 ExecuTorch 執行階段是不透明的,並且顯示為一個特殊的 call_delegate 指令,該指令要求相應的後端處理子圖或程式的執行。由於後端委派的不透明性質,原生開發人員工具無法查看委派的程式。因此,與非委派的程式相比,委派執行的除錯、功能或效能體驗會受到顯著影響。
為了向使用者提供一致的除錯體驗,無論模型是否使用委派,開發人員工具都提供了一個介面,將委派的 (子) 圖與原始 (子) 圖關聯起來。開發人員工具透過除錯控制代碼映射來實現這一點,該映射允許委派產生內部控制代碼,這些控制代碼可以與委派使用的原始 (子) 圖相關聯。然後,在執行階段,後端開發人員可以使用內部控制代碼報告錯誤或分析資訊,該控制代碼將使用除錯控制代碼映射到原始 (子) 圖。如需更多資訊,請參閱 委派除錯。
透過利用除錯識別碼,後端開發人員可以將除錯嵌入為委派 blob 的一部分
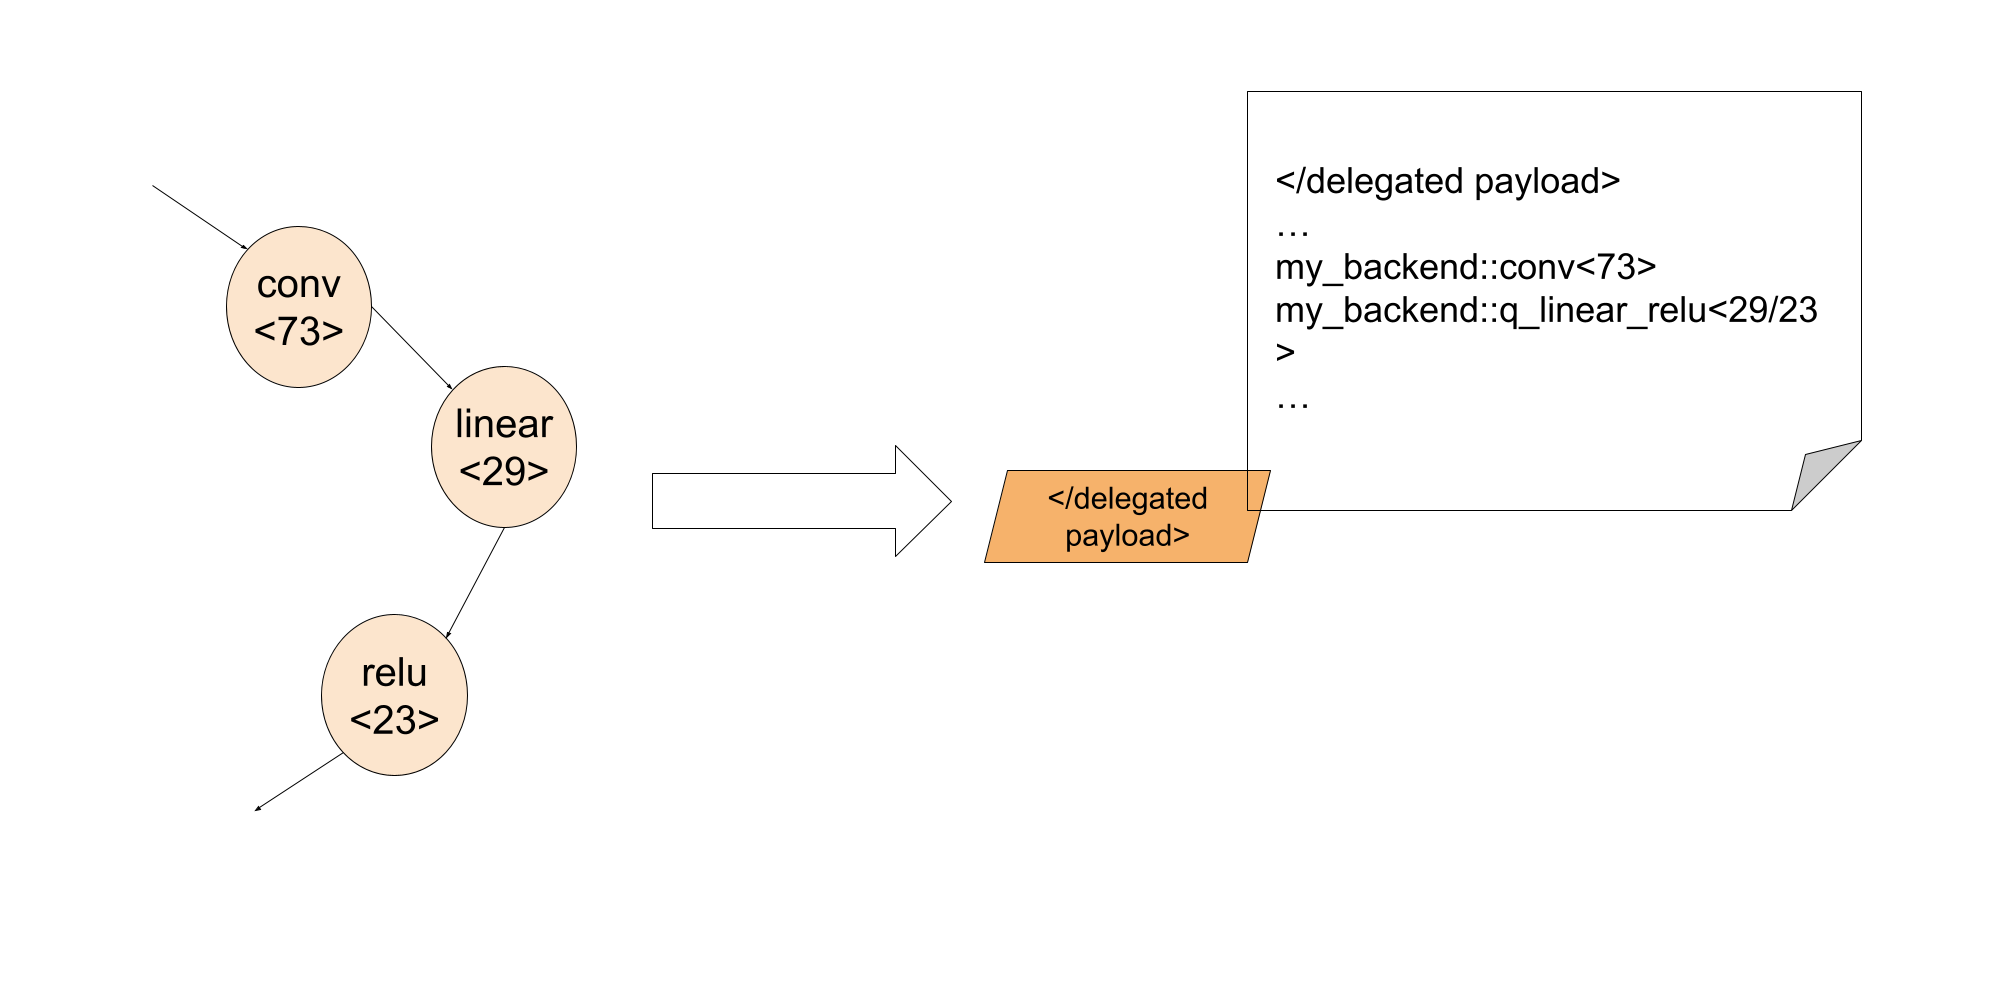
透過這種方式,在執行階段,有了除錯識別碼,後端開發人員就可以將委派內的失敗指令與 PyThon 程式碼的確切行關聯起來。
常見問題
1. 我們如何在 backend.preprocess 中取得資料?
正在預處理的圖形模組是一個提升的圖形,這意味著像權重和偏差這樣的靜態資料作為圖形的輸入提供。但是,我們可以透過匯出的程式預先存取權重和偏差。要從給定節點存取這些參數,我們可以使用 torch/_export/utils.py 中提供的函數 get_params
2. 我們如何將資料 (如權重/偏差) 嵌入到後端?
後端通常有一些方法來優化 const 資料。在這種情況下,我們需要標記佔位符節點,這些節點也是分割器中的狀態,並且在 backend.preprocess 期間,我們可以按照第一個問題中的描述來獲取權重。
3. 我們如何使用特定後端在 Python 中執行降低的模組?
我們尚未新增支援,但這是計劃!
4. 我們是否應該在 edge dialect 程式中看到 get_attr 節點?
get_attr 節點僅會顯示用於控制流程或委派的子模組。它不會保存任何資料。
5. 我們可以委派給多個後端嗎?
是的!有兩種方法可以做到這一點:
選項 1:針對不同的後端多次執行 to_backend
如果我們有兩個後端,backend_1 和 backend_2,並且它們有自己的分割器:backend_1_parititioner 和 backend_2_partitioner,我們可以像這樣運行它:
# Will first lower nodes to backend_1 depending on the backend_1_parititioner depending on partitioner algorithm
exported_program_backend_1 = to_backend(exported_program, backend_1_parititioner())
# For the rest of nodes, they will be lowered to backend_2 depending on backend_2_parititioner
exported_program_backend_1_and_2 = to_backend(exported_program_backend_1, backend_2_parititioner())
一個更具體的例子可以在這裡找到。在這個例子中,qnnpack 是一個後端,而 xnnpack 是另一個後端。我們尚未開源這兩個後端委託,因此這個例子無法直接執行。它可以作為參考,了解如何完成。
這個選項很容易嘗試,因為通常所有後端都會實現自己的分割器 (partitioner)。但是,如果我們更改 to_backend 呼叫的順序,這個選項可能會得到不同的結果。如果我們想要更好地控制節點,例如它們應該去哪個後端,則選項 2 更好。
選項 2:擁有一個為不同後端進行分割的分割器 (partitioner)
另一個選項是創建一個自定義的分割器 (partitioner),例如分割器 backend_1_2_partitioner,並且在分割器邏輯中,
class Backend_1_2_Partitioner(Partitioner):
    """
    Partitions all add/mul nodes regardless of order for Backend2
    """

    def __init__(self) -> None:
        self.delegation_spec_1 = DelegationSpec("Backend1", [])
        self.delegation_spec_2 = DelegationSpec("Backend2", [])
        self.partition_tags = {}

    def partition(
        self, exported_program: ExportedProgram
    ) -> ExportedProgram:

        # Tag all nodes in the first partiton to backend 1
        node_to_backend_1 = ... # some logic to select the nodes from the graph
        delegation_tag = f"backend2_tag{partitioner_1.id}"
        node.meta["delegation_tag"] = delegation_tag
        self.partition_tags[delegation_tag] = self.delegation_spec_1

        # Tag all nodes in the first partiton to backend 2
        node_to_backend_2 = ... # some logic to select the nodes from the graph
        delegation_tag = f"backend2_tag{partitioner_2.id}"
        node.meta["delegation_tag"] = delegation_tag
        self.partition_tags[delegation_tag] = self.delegation_spec_2
        return exported_program
6. 有沒有簡單的方法來編寫分割器 (partitioner)?
我們在這裡提供了一些輔助分割器 (partitioner) 這裡,以便更容易地從分解的運算符中找到節點。
7. 我們如何將節點鏈接回原始碼? 我們提供一個輔助函數
from executorch.exir.print_program import inspect_node

print(inspect_node(graph, node))
它將突出顯示圖表中的節點並指向原始碼,範例輸出如下所示
_param_constant1 error_msg:  Here is the node in the graph module:
graph():
    %arg0_1 : [num_users=1] = placeholder[target=arg0_1]
    %_param_constant0 : [num_users=1] = get_attr[target=_param_constant0]
--> %_param_constant1 : [num_users=1] = get_attr[target=_param_constant1]
    %aten_convolution_default : [num_users=2] = call_function[target=executorch.exir.dialects.edge._ops.aten.convolution.default](args = (%arg0_1, %_param_constant0, %_param_constant1, [1, 1], [0, 0], [1, 1], False, [0, 0], 1), kwargs = {})
    %_param_constant2 : [num_users=1] = get_attr[target=_param_constant2]
    %_param_constant3 : [num_users=1] = get_attr[target=_param_constant3]
    %aten_convolution_default_1 : [num_users=1] = call_function[target=executorch.exir.dialects.edge._ops.aten.convolution.default](args = (%aten_convolution_default, %_param_constant2, %_param_constant3, [1, 1], [0, 0], [1, 1], False, [0, 0], 1), kwargs = {})
    %aten_add_tensor : [num_users=1] = call_function[target=executorch.exir.dialects.edge._ops.aten.add.Tensor](args = (%aten_convolution_default, %aten_convolution_default_1), kwargs = {})
    %_param_constant4 : [num_users=1] = get_attr[target=_param_constant4]
    %_param_constant5 : [num_users=1] = get_attr[target=_param_constant5]
    %aten_convolution_default_2 : [num_users=1] = call_function[target=executorch.exir.dialects.edge._ops.aten.convolution.default](args = (%aten_add_tensor, %_param_constant4, %_param_constant5, [1, 1], [0, 0], [1, 1], False, [0, 0], 1), kwargs = {})
    %aten_gelu_default : [num_users=1] = call_function[target=executorch.exir.dialects.edge._ops.aten.gelu.default](args = (%aten_convolution_default_2,), kwargs = {})
    return [aten_gelu_default]
This node _param_constant1 has metadata of:
The node stacktrace:
Traceback (most recent call last):
    File "/tmp/ipykernel_1204253/3382880687.py", line 7, in forward
return self.test_model(x)
    File "/mnt/xarfuse/uid-25337/7b86ad0c-seed-nspid4026532987_cgpid2707357-ns-4026532984/torch/nn/modules/module.py", line 1528, in _call_impl
return forward_call(*args, **kwargs)
    File "/tmp/ipykernel_1204253/712280972.py", line 10, in forward
a = self.conv1(x)
